Across the Universe: An Astrophotography Adventure
My first photography trip was to Utah to learn how to shoot the stars. It was exhausting, sometimes terrifying, and absolutely one of the best experiences I’ve ever had.
I’ve taken a lot of cool photography trips this year. Photography has actually made me want to travel more, it adds a technical challenge to the sightseeing experience that really works for me. From puffins in Maine to birding and boating in Ocean City, I’ve already written about most of them here. But not this one. The very first trip I took, the one that sent me alone into the deserts of Utah to learn how to photograph the stars.
Of all the areas of photography I’ve dabbled in over the last year and a half, astrophotography has been near the top of my list. That said it’s complicated, demanding, and on the east coast it doesn’t even really get dark. When I found a workshop hosted by two renowned astrophotographers, Marc Rassel (@marcrasselphoto) and Baillie Farley (@bfarleyphotos), I couldn’t resist the opportunity. It was in Utah, with some of the most incredible landscapes and darkest skies in the country, with two amazing teachers, so I booked the workshop and went though the very difficult process of acquiring the right gear, and figuring out how to fit it all in one bag (I didn't).
Gear and Preparation
Astrophotography is not something you just wing. It takes specialized gear, and heading into my first workshop I wanted to make sure I was covered. My main setup was a Nikon Z8 paired with the NIKKOR Z 14–24mm f/2.8 S as my workhorse astro lens. I carried a Nikon Zf as backup, along with a NIKKOR Z 24–70mm for versatility.
The big new piece for me was the Benro Polaris Astro Edition with its dedicated camera mount. Shooting at f/2.8, the tracker was essential and ended up being one of the most important pieces I brought. I mounted it on an Explorer Ascent Professional Carbon Fibre Tripod, which had the stability I needed for long exposures.
I also brought along a full set of Kase 112mm magnetic filters, including their Astro filter. Being able to swap filters quickly in the dark was a huge benefit, and the Astro filter itself helped cut light pollution in certain scenes.
As backup I packed my Peak Design Travel Tripod along with the Zf, which let me run a second setup. That extra tripod and body came in handy later, and I will share a timelapse or two further on.
Because I cannot resist overpacking, I hauled along the NIKKOR Z 400mm f/4.5 VR S thinking I might grab some wildlife. In hindsight, I should not have bothered. There was already too much to shoot with the landscapes, and the 70–200mm f/2.8 would have been the smarter choice.
Of course there were the usual extras like batteries, cards, chargers, and cables. The unsung hero was a little camping chair that made hours under desert skies much easier. This is the one I used: the NEMO Moonlite Reclining Camp Chair. Trust me if your sitting outside all night waiting on your camera to do stuff, there is nothing like having a nice chair, and this one weighs almost nothing and reclines so you can stargaze while you wait.
In retrospect, you can absolutely do astrophotography with f/2.8 lenses, especially if you are using a tracker. I proved that on this trip. But it is not something I think I ever want to do again. Faster glass makes the process so much smoother, and in my mind 1.8 is the minimum, with 1.4 being ideal. I am just waiting for Sigma to release the 14mm f/1.4 in Nikon Z mount so I can make the upgrade.
Back to the Story
With me having never been out to the Midwest like this, my wife convinced me to head out a few days early, and I am glad she did. I decided to land in Salt Lake City, rent a car, and make the several-hour drive down to Moab to take in the sights. That turned out to be another great decision. The whole area was so diverse, from snow-capped peaks, to open plains, to stark desert. It was an incredible drive.
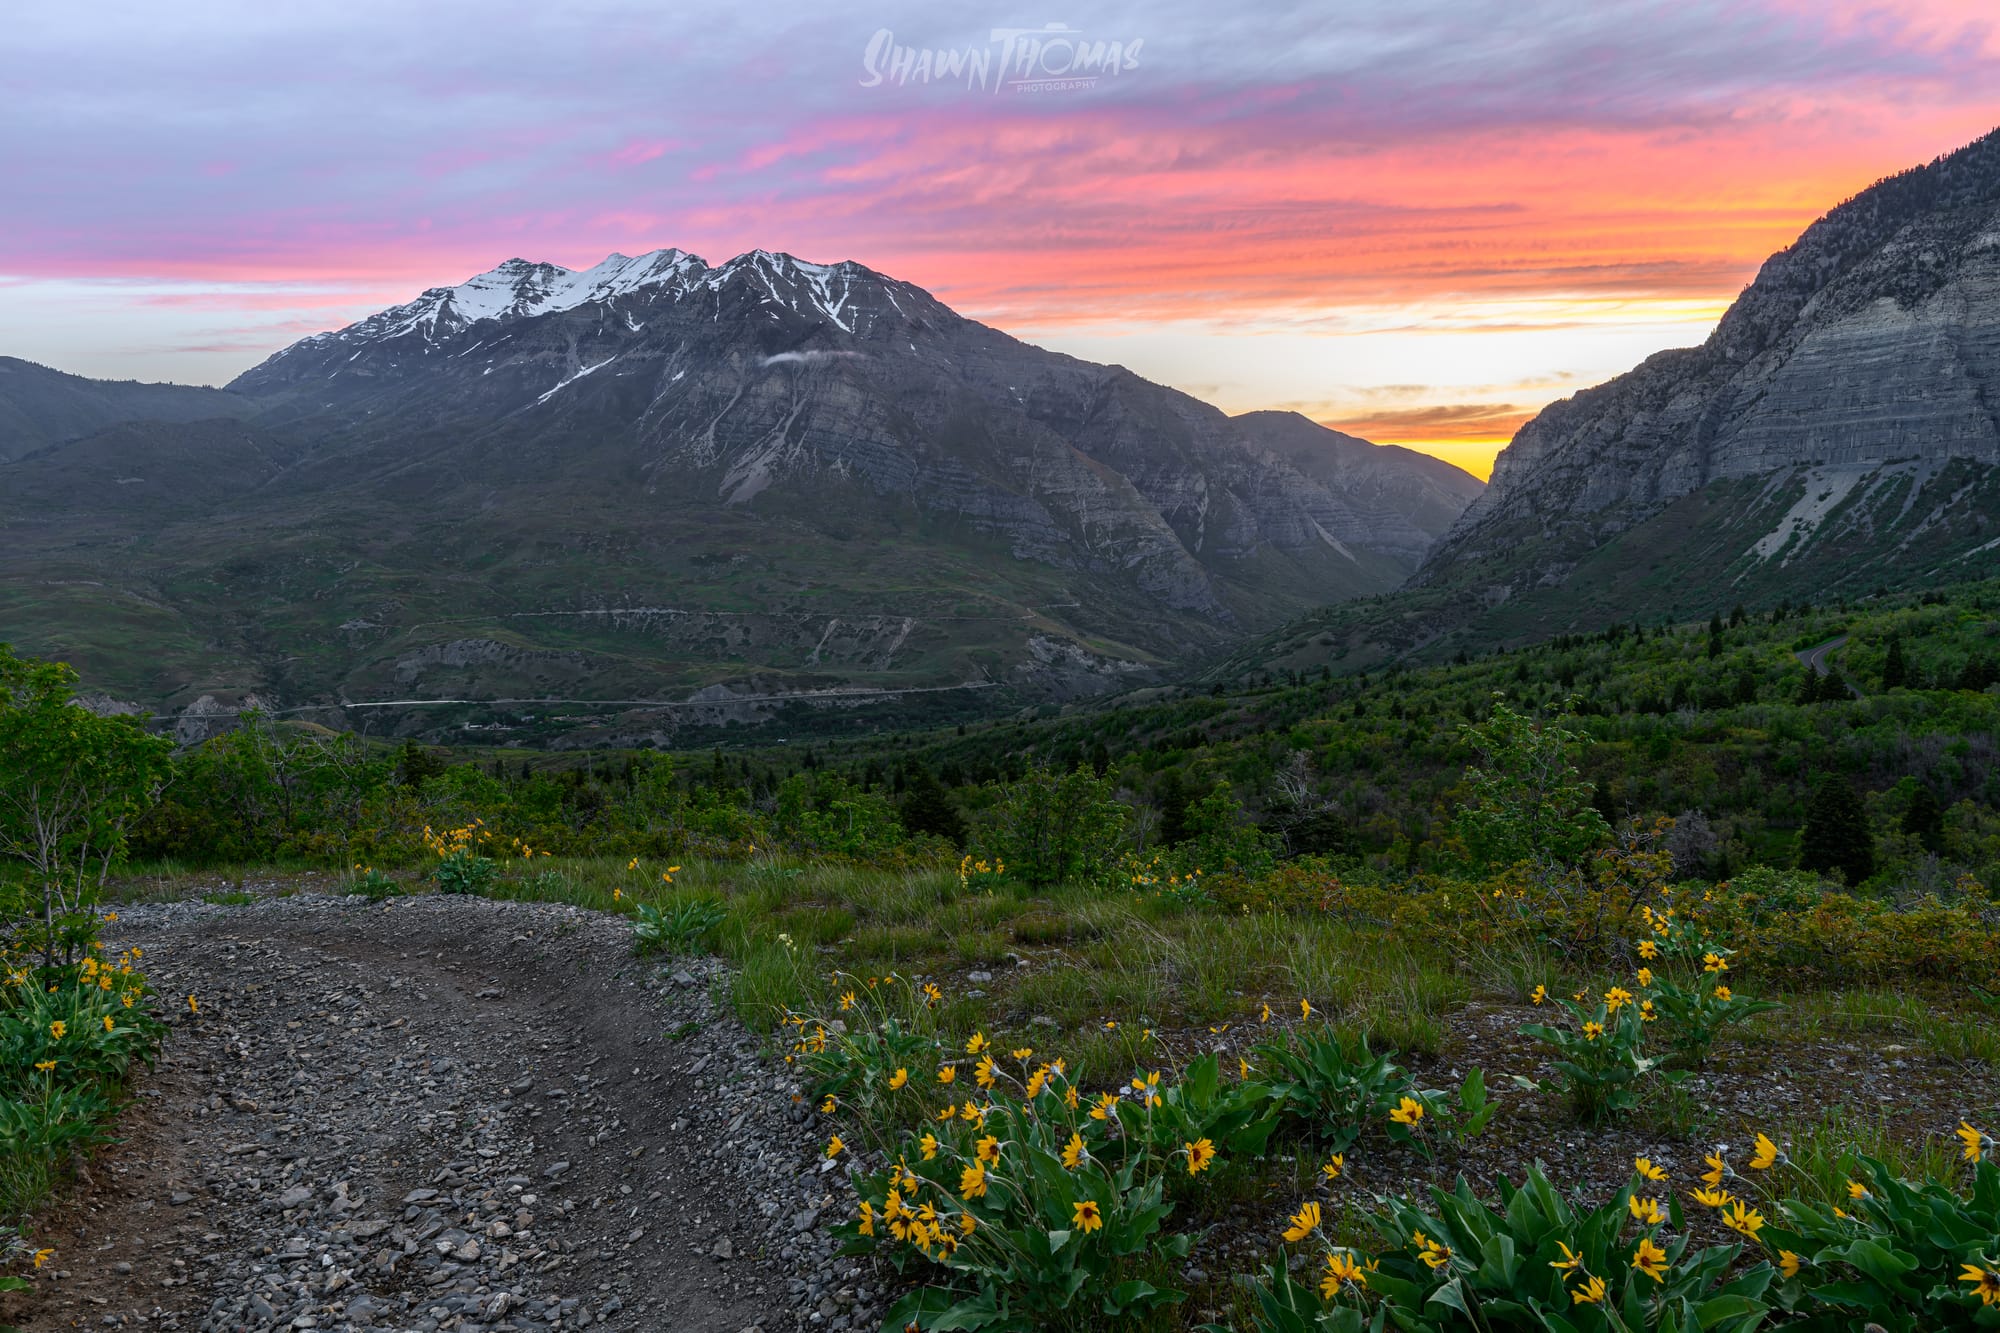
I got into Salt Lake at night, and the next morning my default instinct kicked in: find a wildlife spot. But while having breakfast at an IHOP, my waitress suggested I check out a mountain overlook instead. Always trust the locals. So that is where I went.
The mountains outside of Salt Lake City
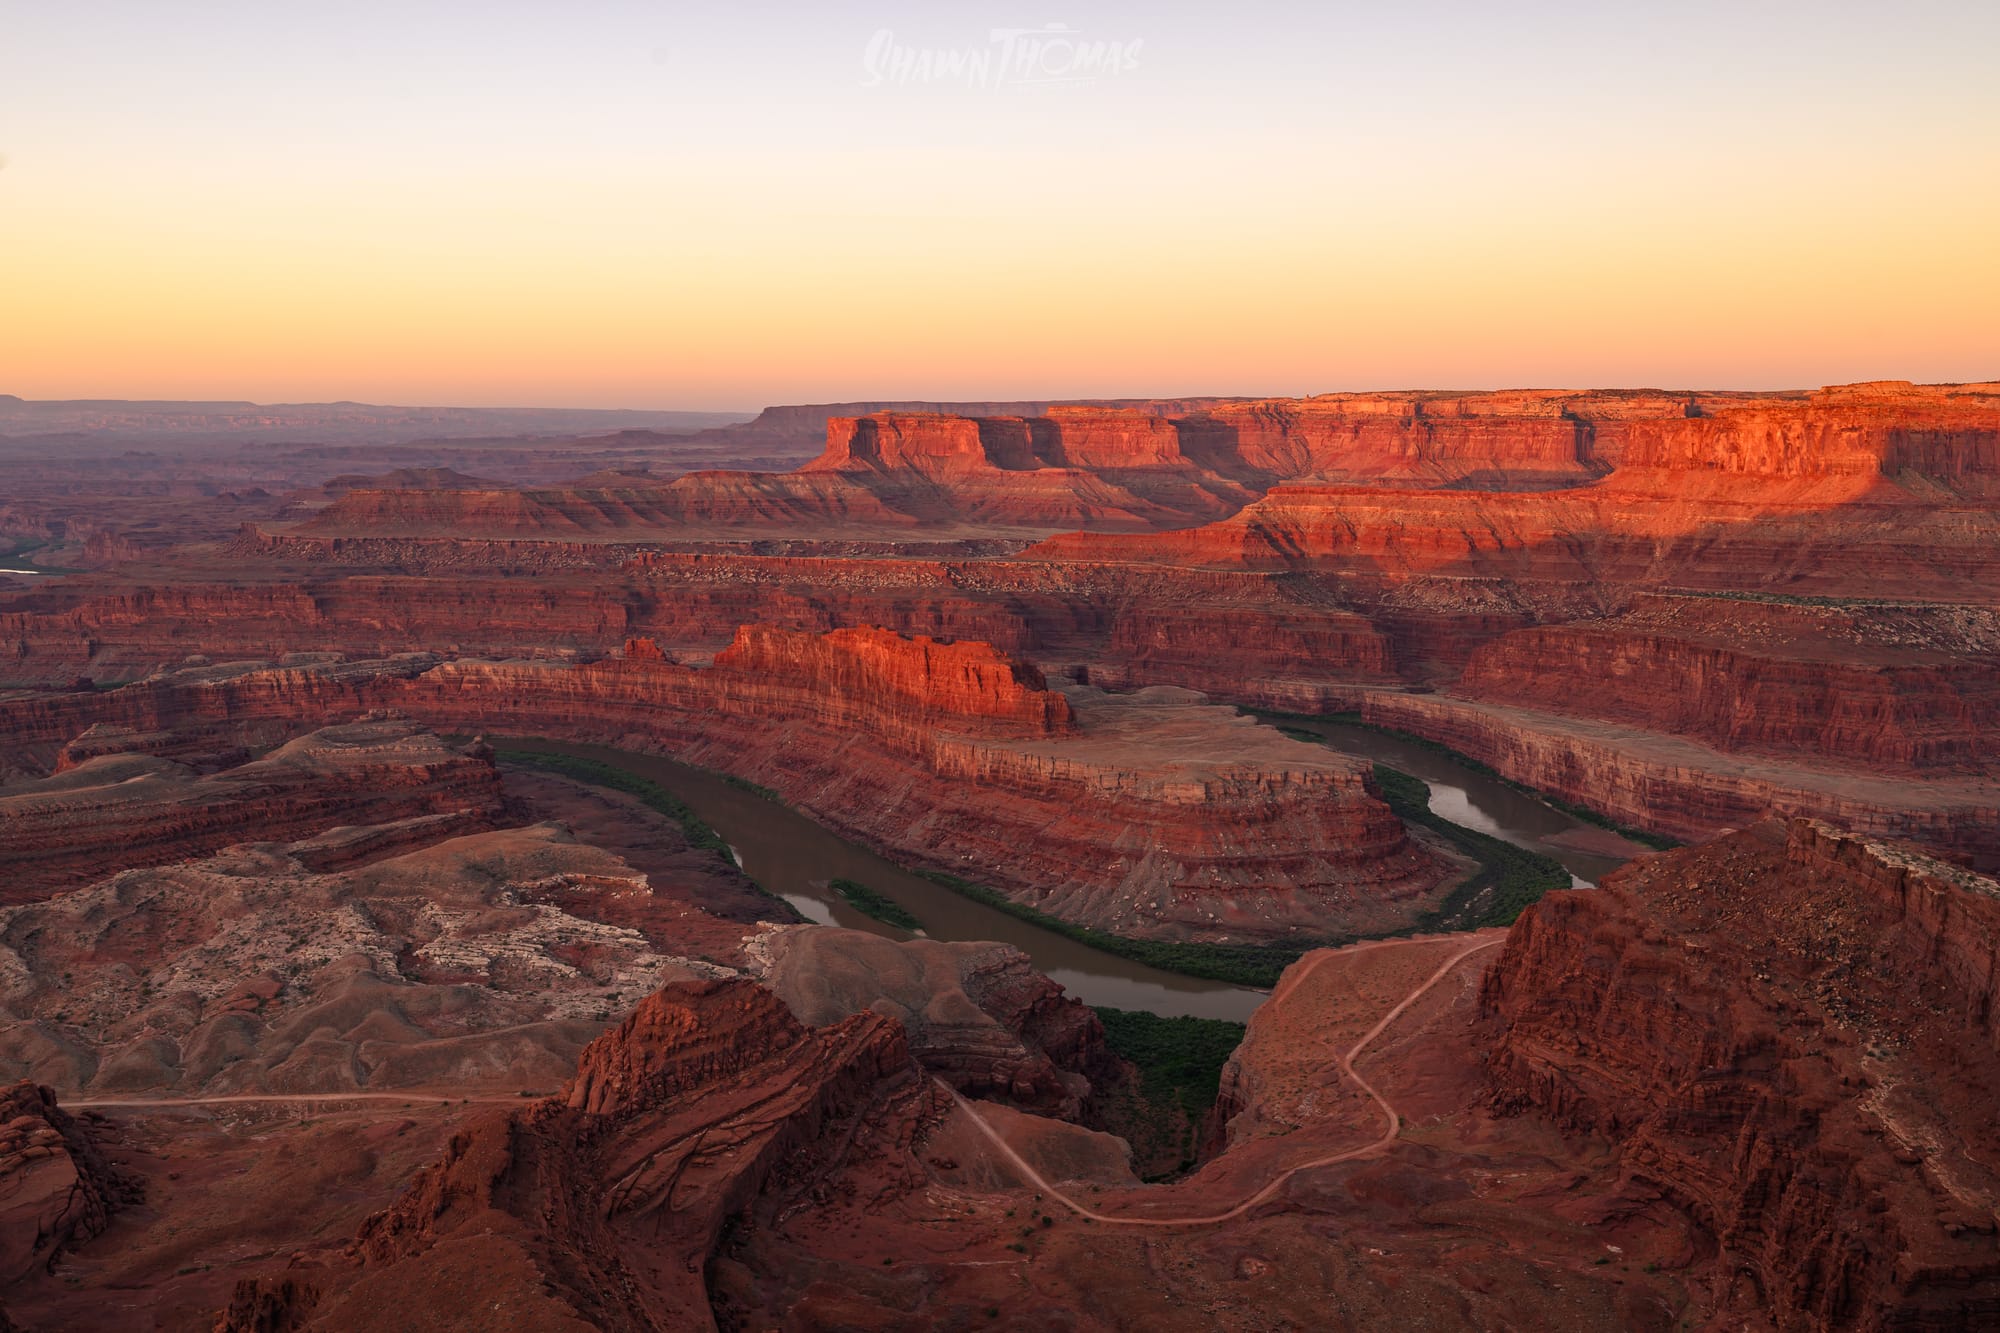
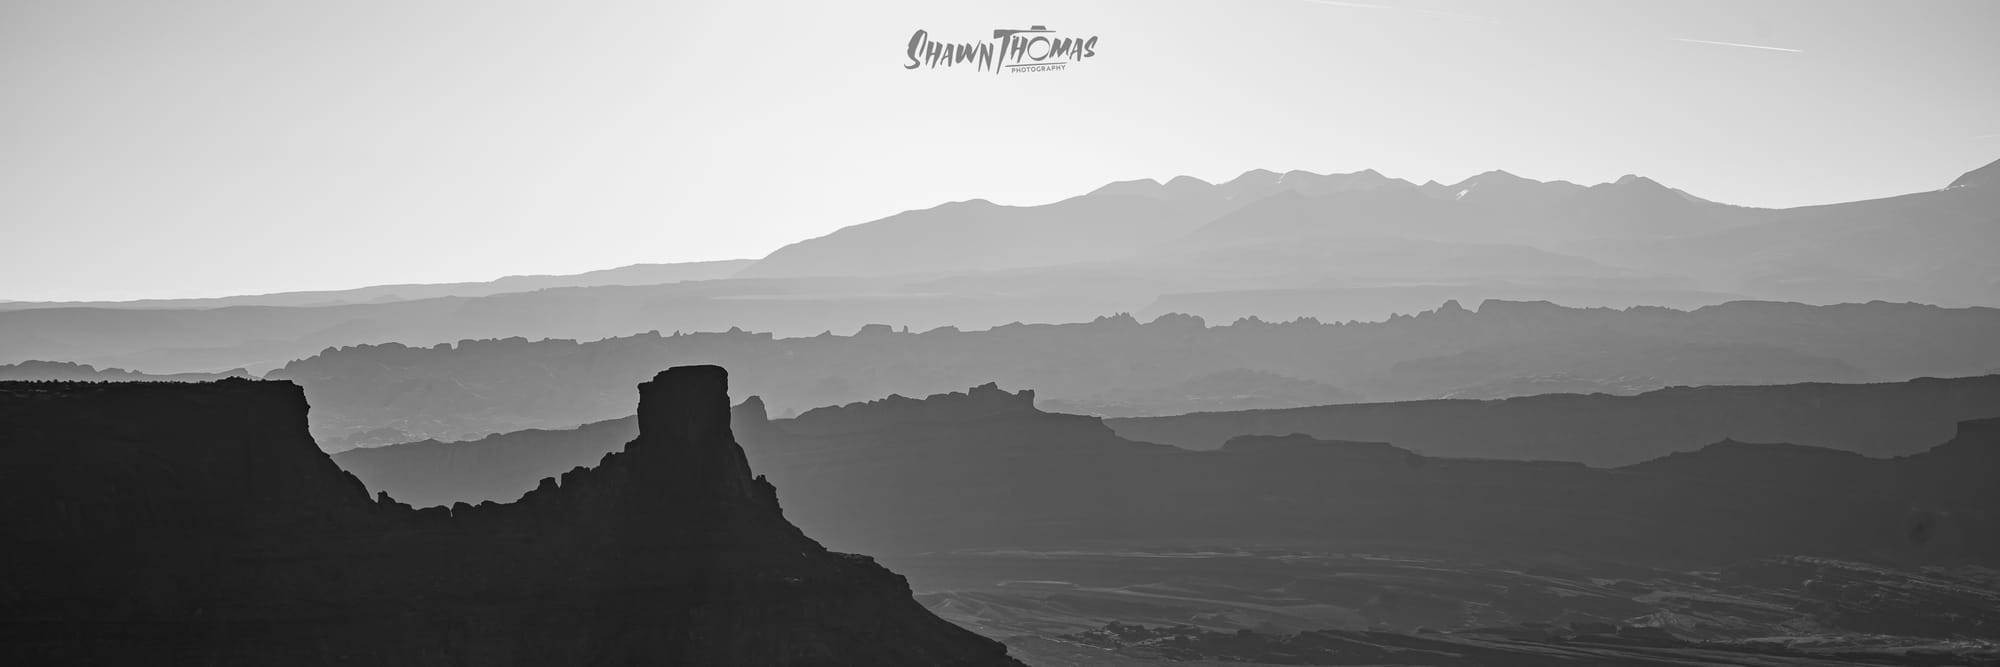
From there I started the long drive down to Moab with a few days to myself and very little planning. The one place I knew I wanted to shoot was Dead Horse Point State Park, and I was also committed to doing a wildlife day. In retrospect I should not have. There were so many incredible landscapes, so much to see, and so many times I wished I had the 70–200 for landscapes instead of the 400 I crammed in for wildlife.
Dead Horse Point: The landscape I knew I wanted, even with a boring sky
Thankfully Marc was kind enough to extend my hotel stay through my early arrival, which gave me a home base and some time to explore. I am not going to spend much time on those experiences here. I took the image I wanted even though the sky was flat and boring, I chased wildlife and saved none of the pictures, I got eaten alive by bugs, and I wandered through national park gift shops to pick up things for my family. I will just share the images. This blog is about the astro, not my wanderings even if it was a wonderful experience.
Dead Horse Point State Park: Pulled over for this one, the layers were awesome
The Workshop Begins
The workshop started with a safety briefing and then a group dinner where we all had a chance to meet one another. Marc Rassel (@marcrasselphoto) and Baillie Farley set the tone right away. They were approachable, organized, and clearly passionate about what they do. It was a good balance of learning what to expect and just getting to know the group of photographers I would be spending the next few nights with.
After dinner we went back to pack our bags and get ready for night one. Batteries charged, tripods ready, trackers set. The anticipation was building. I was about to head out into the desert for my very first attempt at photographing the Milky Way.
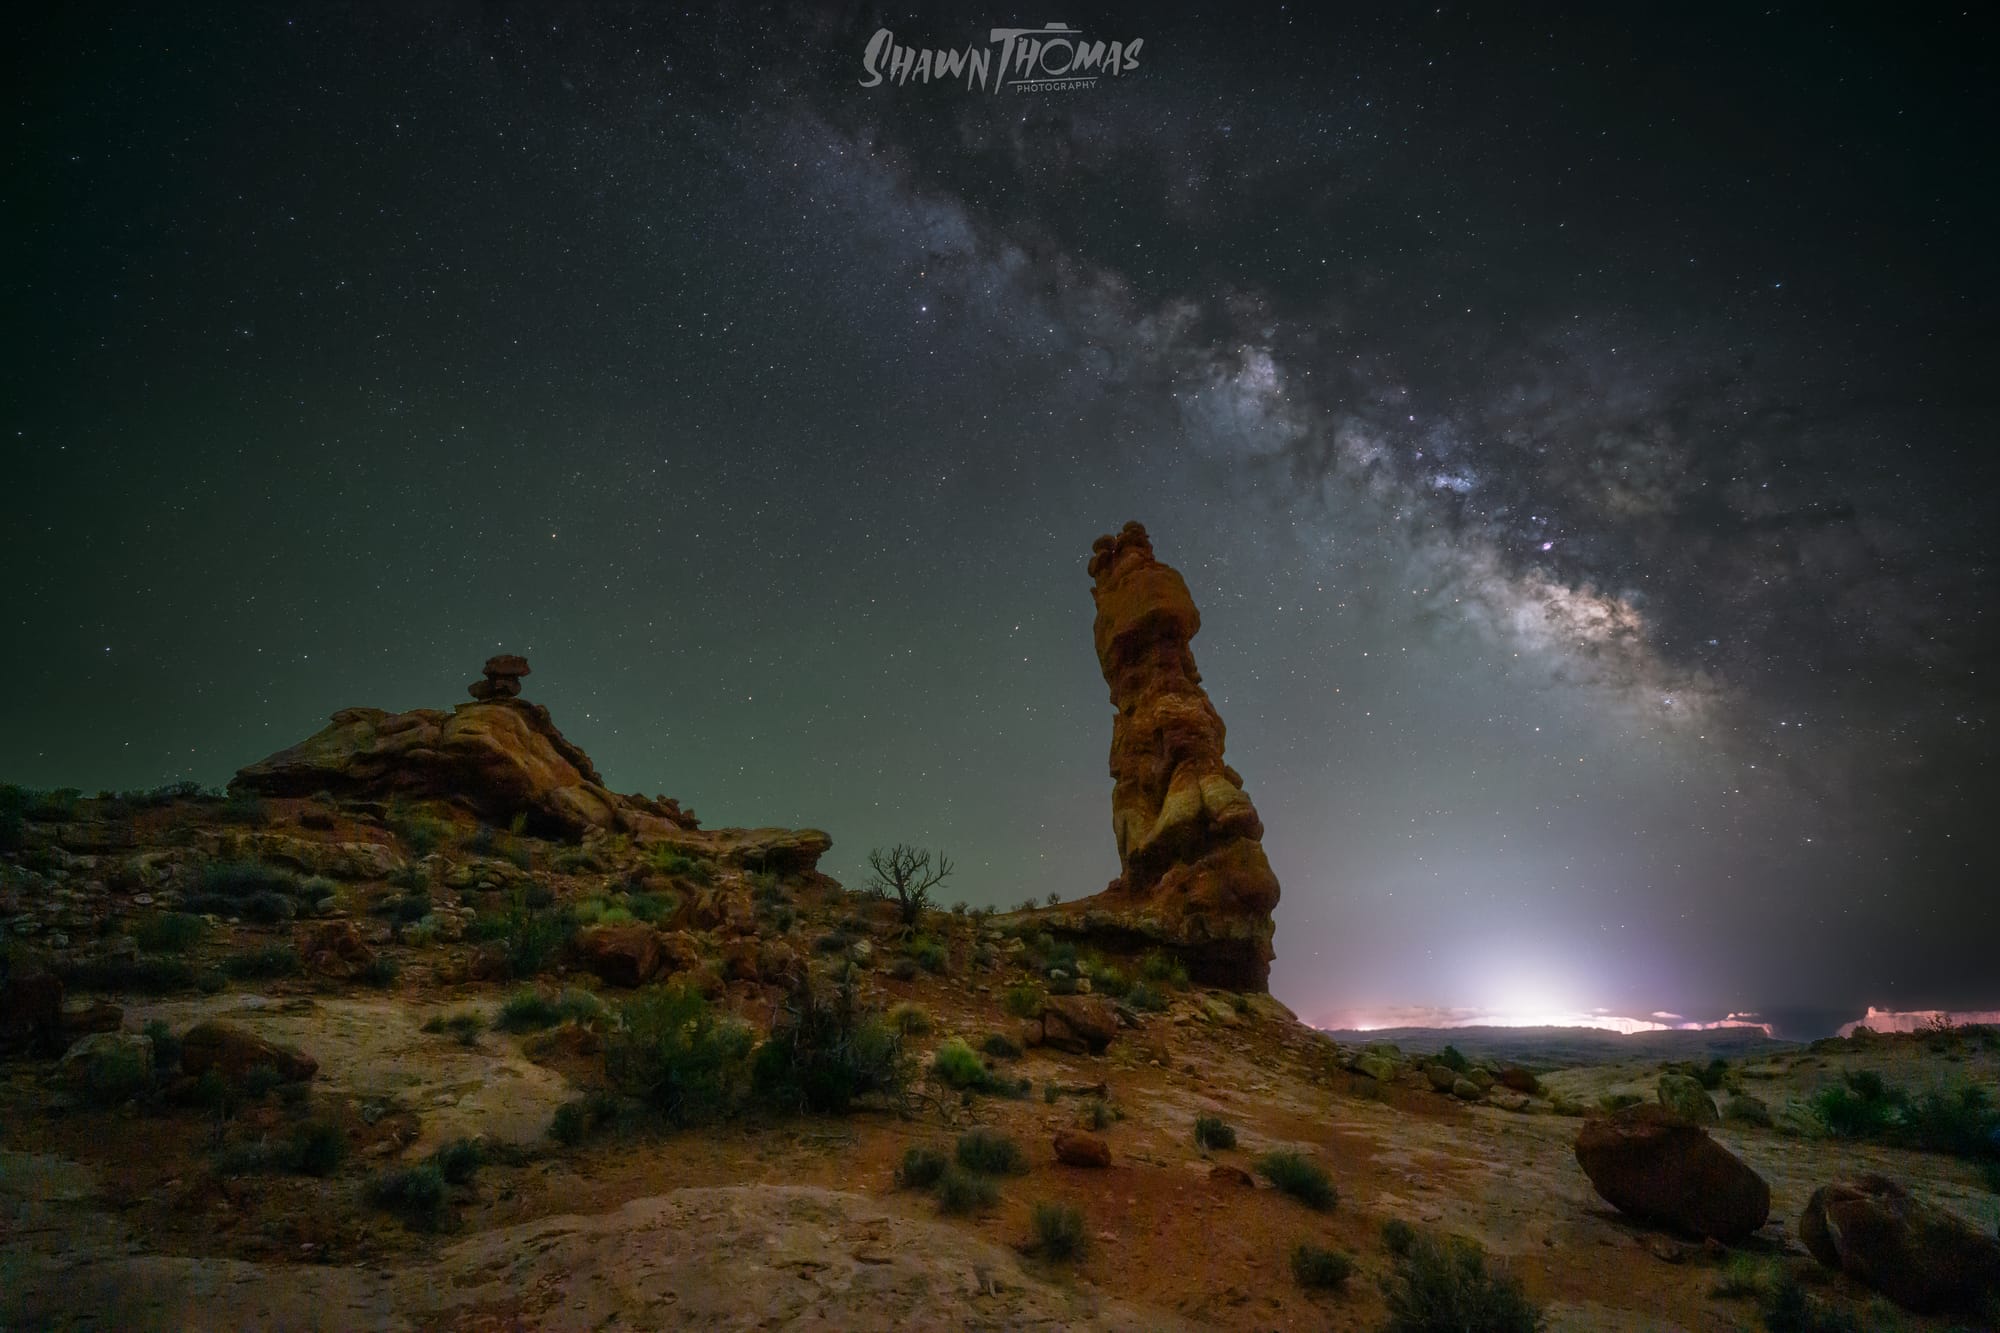
The first night was really just learning to use our gear, get the settings right, and put tape over all the little lights on the camera that glow when you press buttons. This night was focused on image stacking as a technique and we did not pull out the trackers at all, thats a whole other layer of complexity. From there we hit a rock formation and started taking images, we all spread out, found compositions, and started shooting. For me it was the first time actually pointing a camera at the Milky Way and seeing it appear on the screen. It felt surreal to be capturing something I had only seen in other people’s work until then.
My first ever Milky Way image
Each night of shooting was followed by an editing class the next afternoon once everyone had caught up on sleep, not that any of us really caught up on sleep the entire trip. This was where I started to learn the real tricks of the trade when it comes to processing Milky Way images. It was also where I first understood the real limitations of shooting at f/2.8, even when stacking. Up to that point I had no idea, but seeing the difference in editing made it clear. It was not going to meet my perfectionist standards.
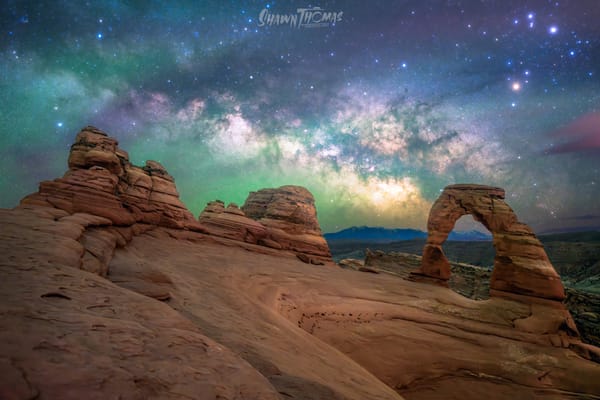
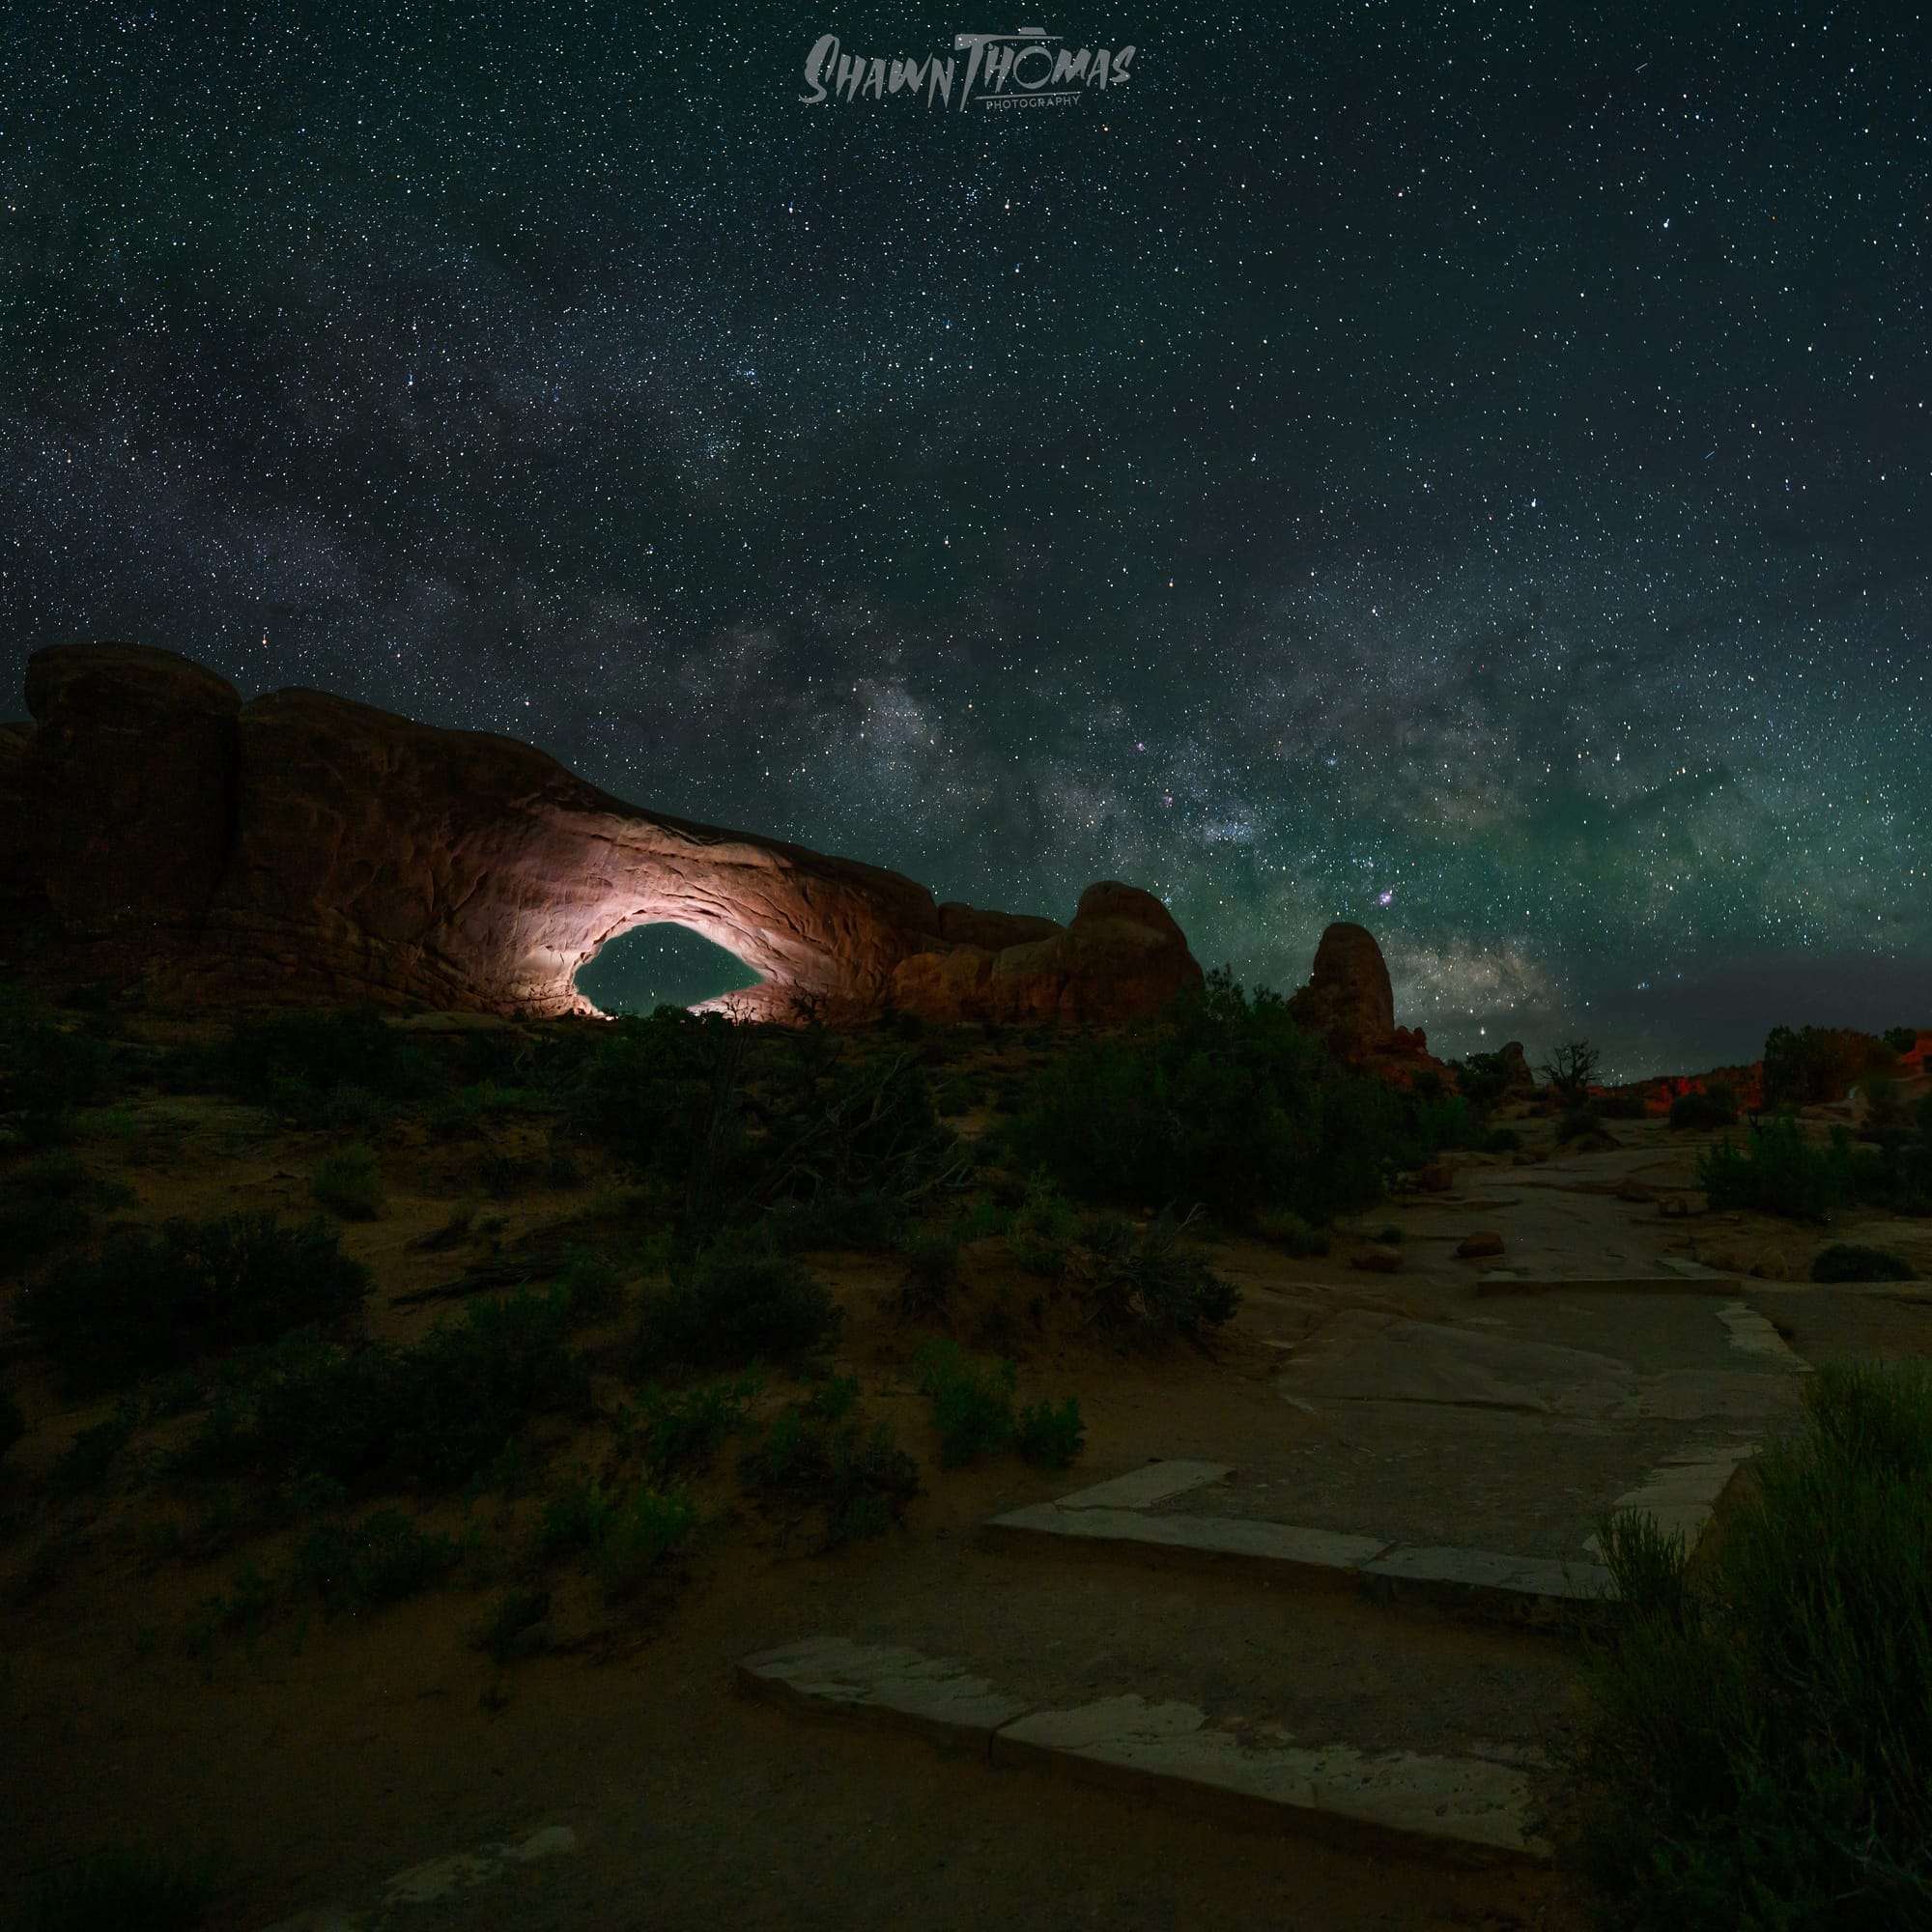
Thankfully I had already invested in the tracker, and by night two we were heading to Delicate Arch, the shot I had been waiting for. I was determined to put that tracker to use, even if it meant carrying the extra weight up a steep hike in the middle of the night. This was the moment I wanted most out of the workshop.
When It All Clicked
That hike was....brutal I'll be honest. Coming from the east coast, the altitude alone made everything harder. On top of that, I discovered something about myself I had never really faced before. I am afraid of heights. Not heights in general, but ledges with steep drop-offs and no railing. The last section of the Delicate Arch hike has a long stretch of just that, and I had no idea how anxiety inducing it would be until it was on it. I was determined though, I pushed through and got the the top, found a good spot and starting setting up. Even while I started preparing my gear, all I could think about was how much I dreaded the return trip. I wanted to stay up there as long as possible, if only to avoid walking that ledge again.
Anyway, tonight was the night I was going to use my tracker. I wanted this shot, I could taste it. The whole workshop would be worth it if I came away with this one image. But the Benro can be temperamental. I took my long exposure foreground frame and started setting it up, planning to get some practice in before the core was in position, and it just was not working.
Thankfully the brilliant Baillie Farley was there to walk me through it. Turns out the unmarked cable is direction sensitive. We flipped it around and suddenly everything worked just fine. Most importantly, I got the shot.
Galaxy over the Arch
The hike down from Delicate Arch was exactly as bad as I thought it would be. I practically ran in front of the group until we got past the ledge. After that it turned into a leisurely stroll down the mountain, much more relaxed than the way up, which was good because it was after four in the morning and we were all exhausted.
Exhaustion Sets In
The next night was a different story. Coming off the high of the Delicate Arch shot, I just wasn’t feeling excited about the compositions at our location. I wandered for a while, thought about shooting star trails, but kept having people walk into frame with flashlights. I took a few one-offs and then went back to the van early to rest. Those nights happen. Sometimes you’re just not feeling it.
It wasn’t until later, looking through the files, that I realized the distractions actually worked in my favor. The flashlights that annoyed me in the moment had lit up the arches in a way that made for a surprisingly compelling shot. It’s one I should honestly put more time into.
The point I’m making here is that it’s ok to not be excited about every image. It’s ok to not always be feeling it, especially on a brutal outing like this, where you’re shooting every night and living way off your normal schedule. Don’t force it. Have fun. And if you come away with something you like, that’s awesome.
It’s All Excitement From Here, and Sitting, Lots of Sitting
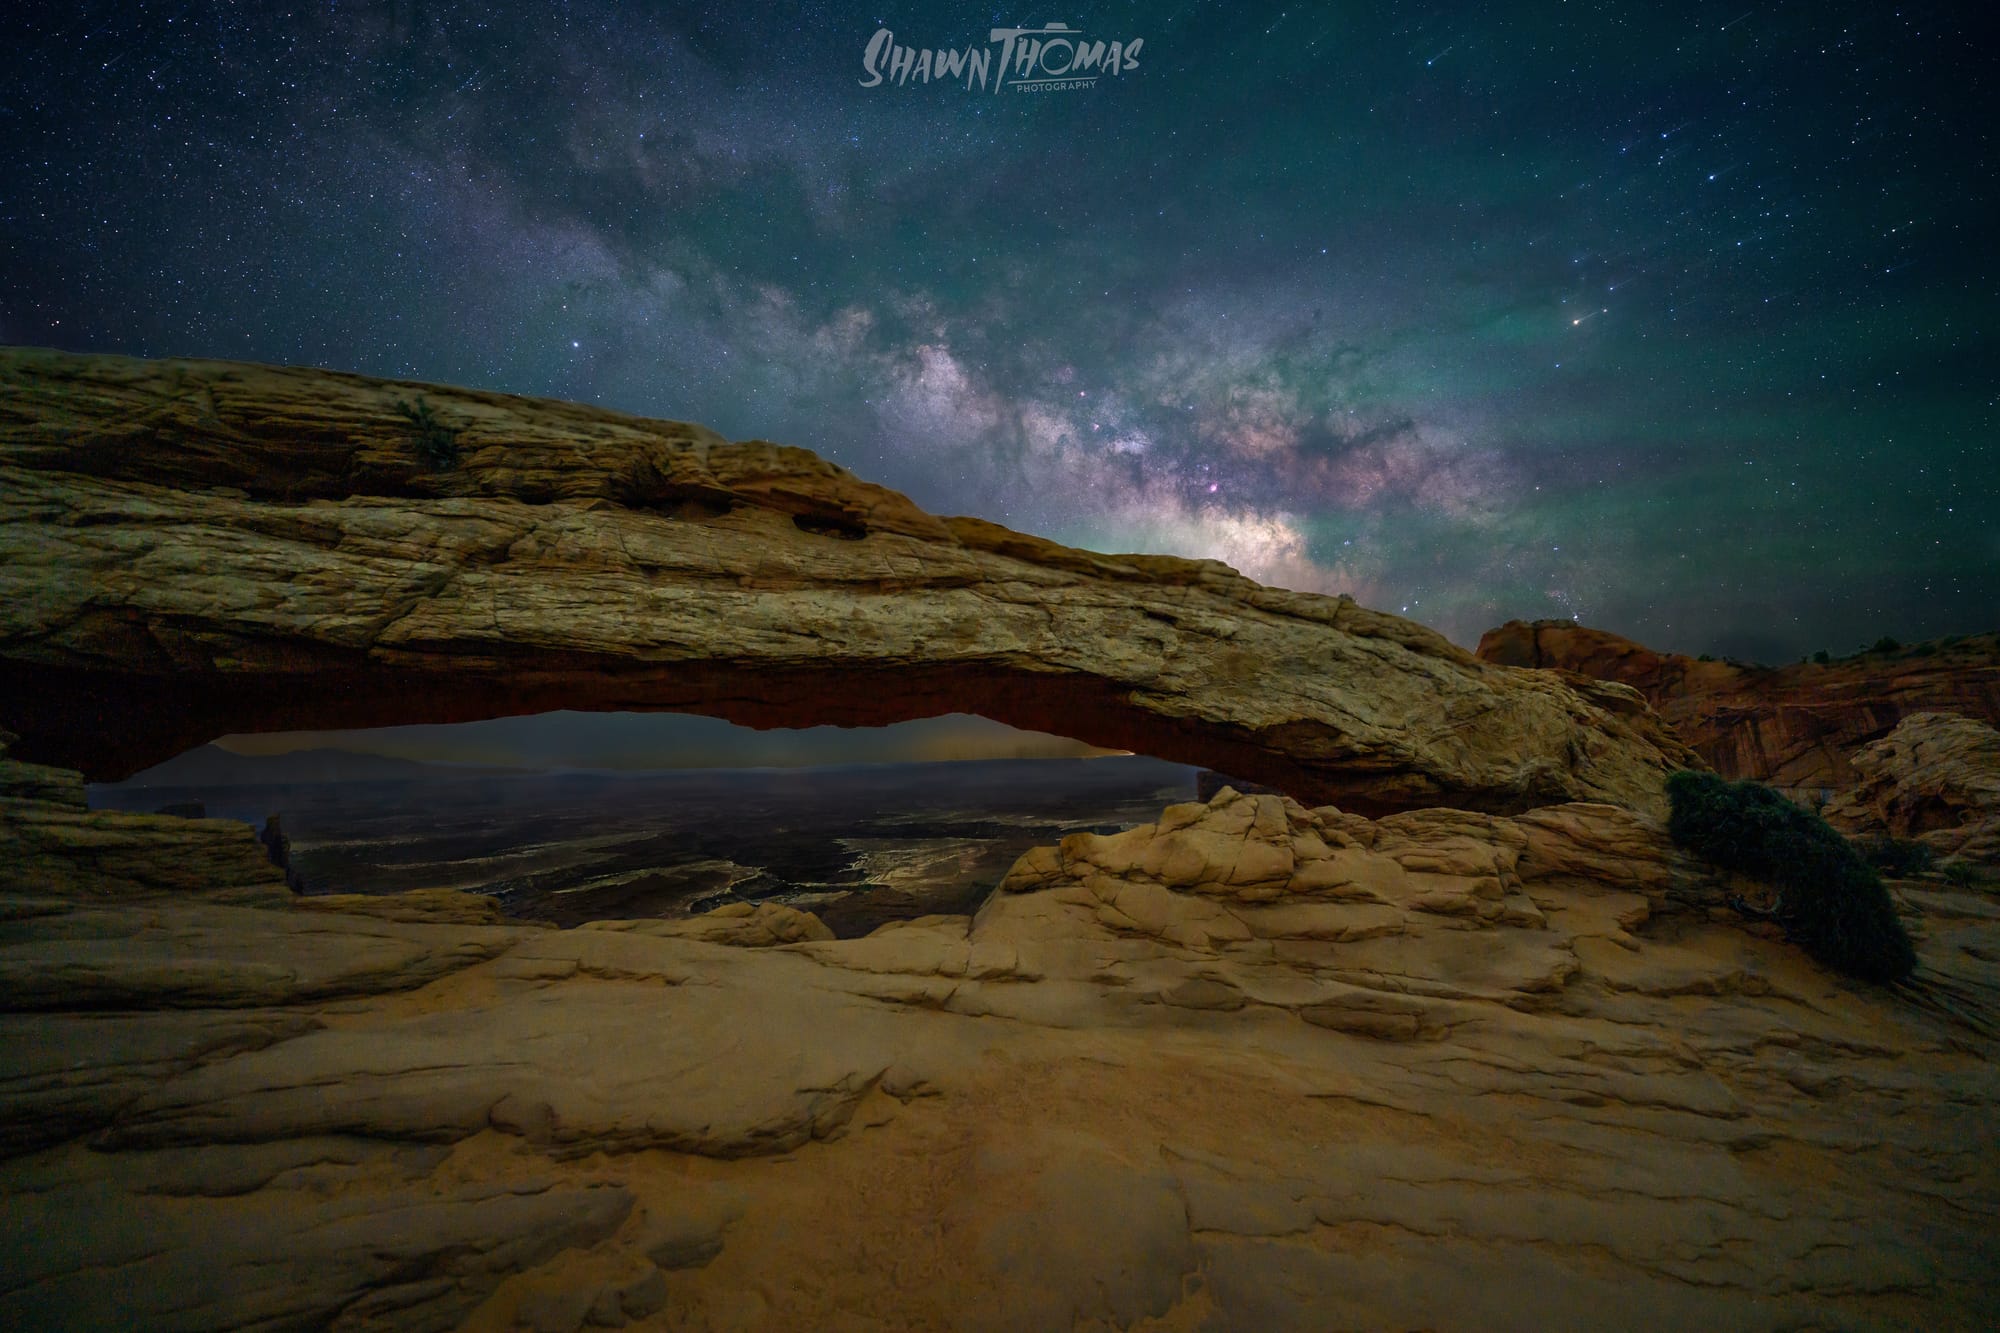
The next night took us to another bucket list location: Mesa Arch in Canyonlands National Park. We arrived early and used an app called Photopills to plot the Milky Way’s rise on location. That let me line up the exact composition I wanted, and the excitement was back in full force.
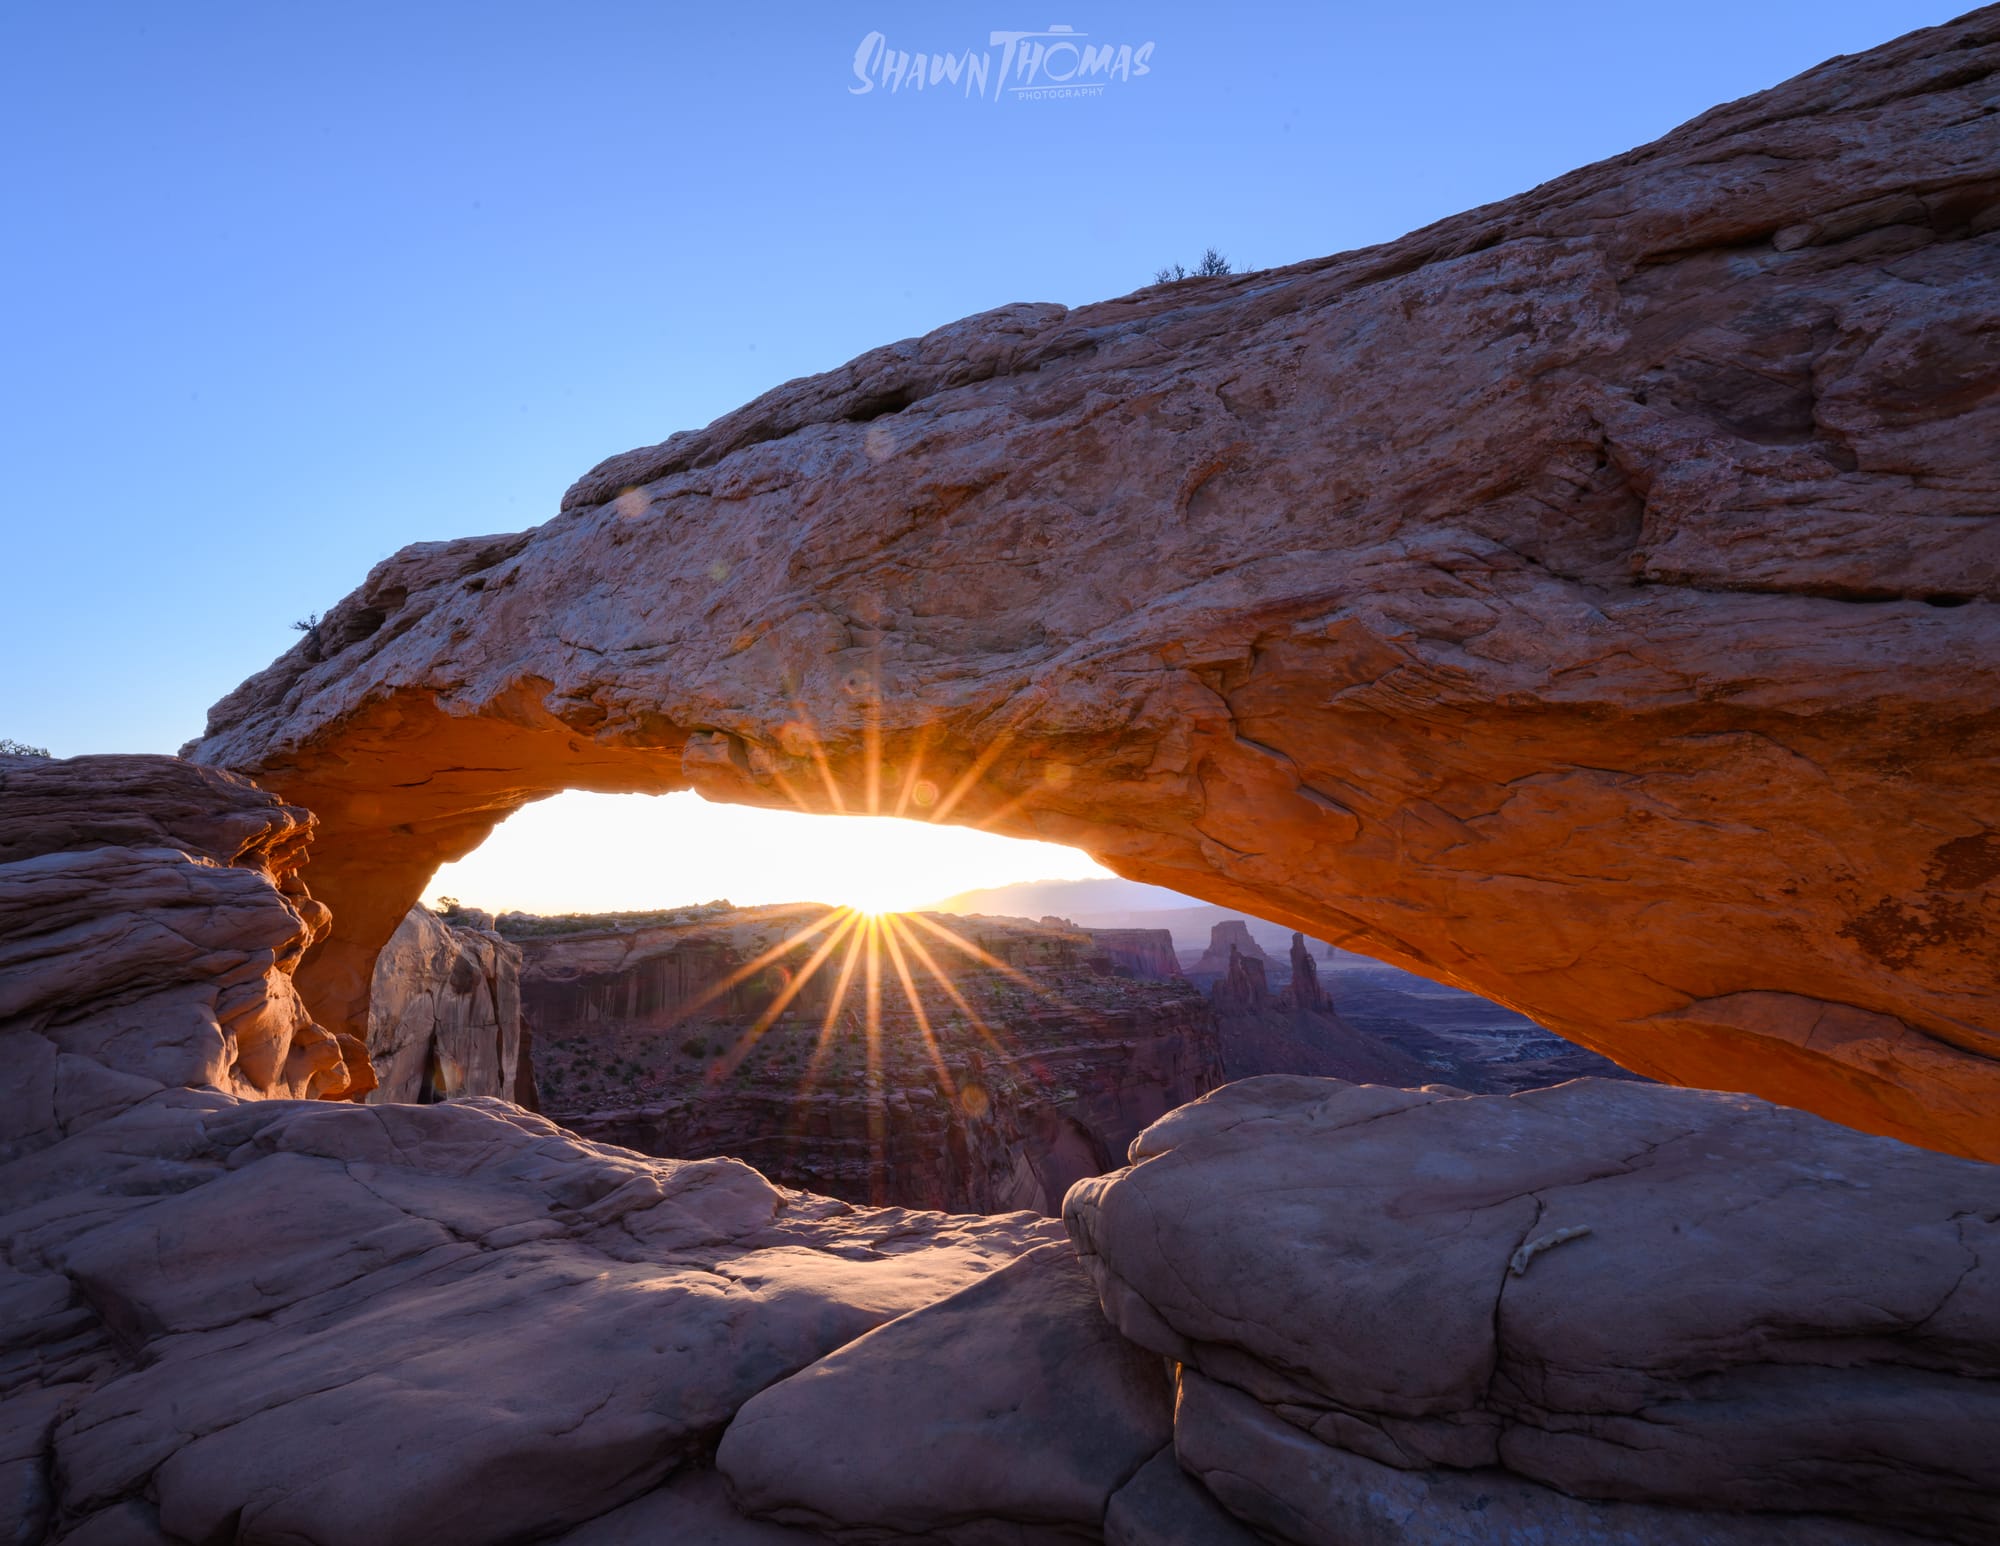
For anyone who doesn’t know, Mesa Arch is a famous sunrise spot. And by famous I mean really crowded. We’ll get to that in a bit, because since we were already there, we decided to stay for sunrise too.
The duality of Mesa Arch
There’s a duality to how I framed these shots. At night, the Milky Way rising over the right side of the arch. In the morning, the sun rising over the left side. Viewed together, it’s a set of images I’ve come to appreciate more as a pair than as standalones.
Staying until sunrise meant that chair I mentioned earlier really came in handy. I got my shot, wandered a little, and then settled in. Leaning back, looking up at the stars, it was glorious just to sit there, I felt at peace, or maybe I was just exhausted. We basically had the whole place to ourselves. At least until the horizon started to glow and the sunrise crowd began to arrive.
Now sunrise at Mesa Arch, well lets just say its popular, as soon as people started coming we all went and claimed our spots, but that didn't keep people from trying to crawl under us, or around us, or in our shots. There were several times I turned my head only to have it hit a camera that someone leaned over my shoulder without so much as a mention. My advice, unless you really want this shot, maybe avoid it, that said I am glad I got it, I'm also glad I set up my second tripod and camera and took a Timelapse of the chaos that is sunrise there though.
0:00
/0:34
The Mesa Arch crowd
The Unexpected Location
The next night we went outside the parks themselves, to a place I wasn’t at all prepared for called Ida Gulch. It’s like a mini Monument Valley just outside of Utah, and I was immediately stunned by the possibilities. I saw compositions everywhere, even right from the parking lot. The Milky Way was going to rise perfectly between two massive pillars. Having guides who knew what they were doing really helped, they just took us to the best places.
Thankfully Marc also gave me a little push, encouraging me to go beyond the parking lot and explore. That’s the sign of a great guide, nudging you to go just far enough to make the best image possible. I hiked for a while and found a spot with a path leading up to the buttes, lining up right where the Milky Way would rise. This was it. This was my spot.
We had time. It was still blue hour, so I got a clean frame off and then set up both tripods. I figured we’d be there a while, so why not try a timelapse or some trails at the same time. And of course, this is where the trusty chair came back into play.
As night fell it was still a while before the Milky Way would rise. My timelapse was running on the second camera, and I had a crazy idea. We weren’t in a national park, which meant there were no rules about light painting, and I was far enough away from the group that I wouldn’t bother anyone if I experimented a little. So I turned on my flashlight, set a long exposure, and ran up the hill. Only I lost the trail partway up. So I went back down and did it all over again. The second time I made it to the top and waited for the shutter to finish before making my way back down. This took a lot out of me, remember I talked about the altitude, while I was getting used to it, it was still quite the workout, thankfully I had my chair.
A while later the Milky Way came up. I set up the tracker and fired frame after frame, looking for that perfect position I could line up later. What came out of it is what I think is one of the most stunning photos from the trip. Definitely the most original and artistic I’ve ever taken, especially with some help from Marc and Baillie on how to blend it all together and make it work.
Footsteps to the Universe - Ida Gulch - Utah
This night was interesting overall. There’s something about being alone in the dark that’s just… mildly terrifying. Your senses get cranked to eleven. Every sound, every rustle, it all hits you. This was the first night I wasn’t surrounded by the group, and I felt it.
Thankfully Henry, a good friend I made on the trip, was only a bit away. We’d scream back and forth to each other through the night, just to let each other know we were still there.
It was also peaceful though, sitting out there alone, watching the Milky Way rise above this incredible landscape, the green skyglow helping to light everything up, it may have been a little scary but I look back on it now as an incredibly fond memory, even though bats, which we named pigeons on this trip, kept flying in front of my face every few minutes and freaking me out. Speaking of watching the Milky Way rise, my second camera captured that as well, a some 800 image timelapse of the moment.
0:00
/0:28
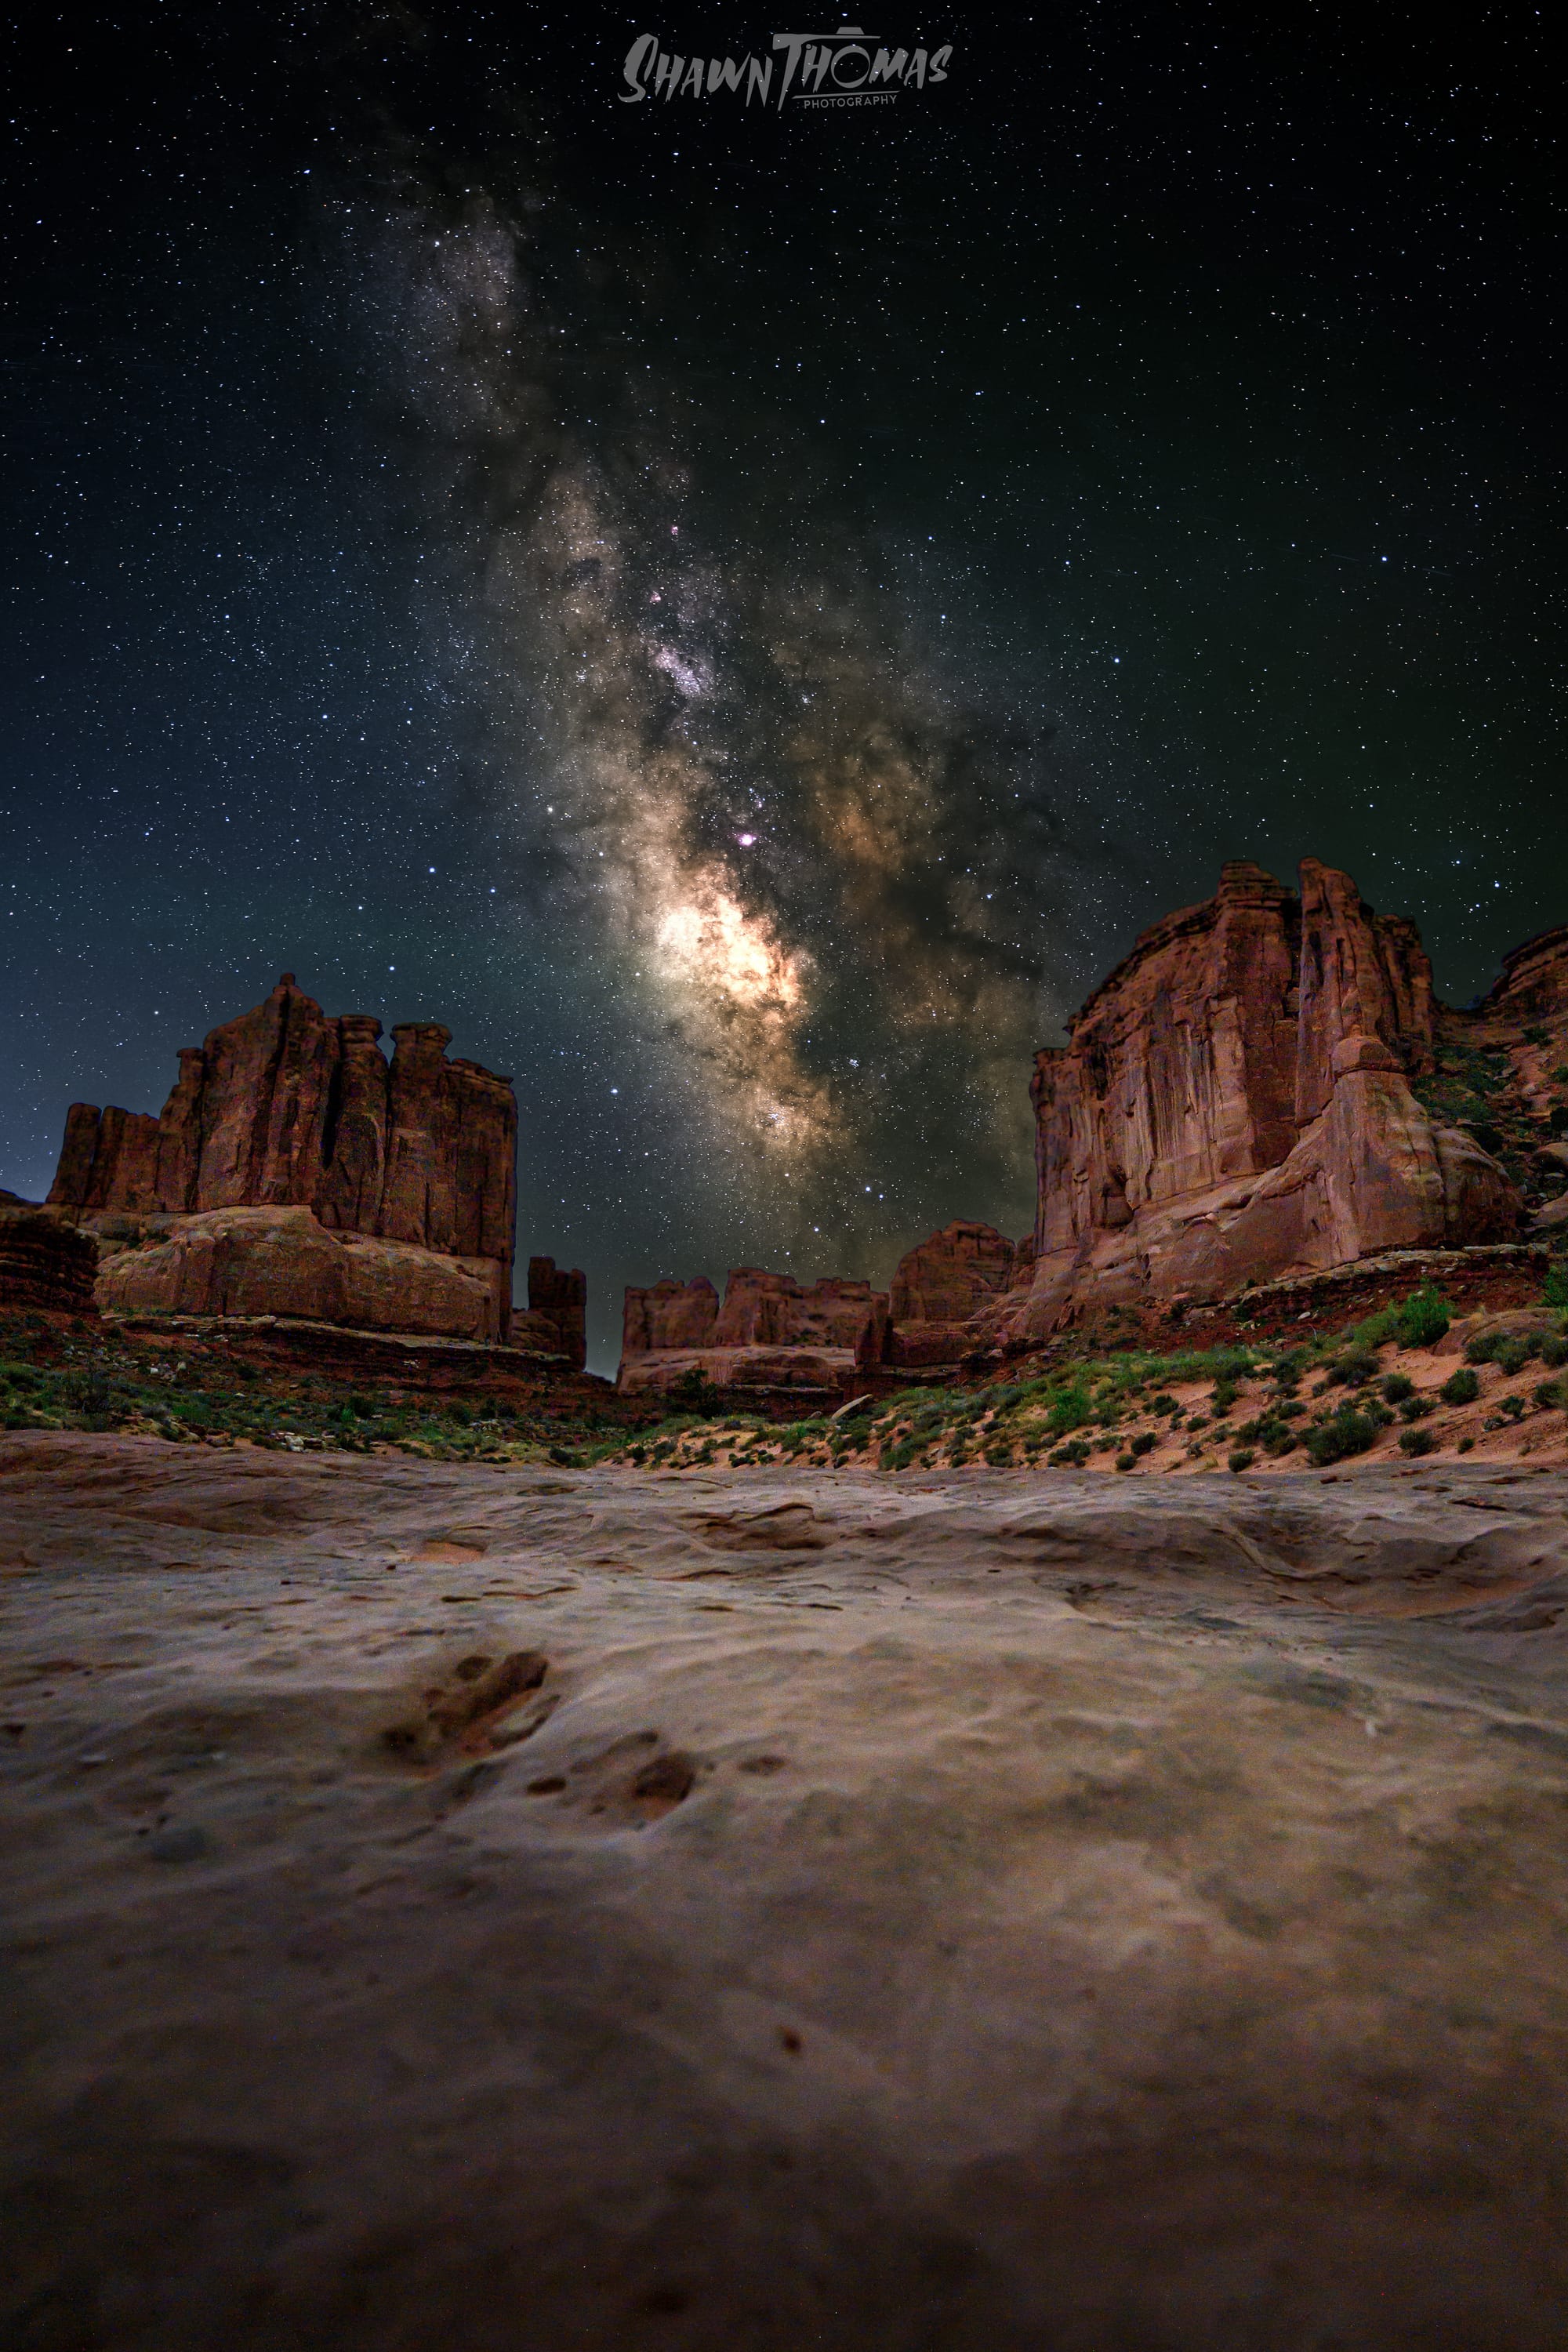
After Ida Gulch the fun wasn’t over. We had one more location that night back in Arches, a quick in-and-out shoot where the Milky Way lined up perfectly with the Courthouse Towers. One of the benefits of having guides is they pre-scout a lot of locations so you don’t have to, at least the good ones do.
No trackers, no fancy setups, just old-school stacked images. Thankfully I’d learned so much by this point that stacking, which had frustrated me early on, ended up working really well even at f/2.8. I walked away with one of my favorite images from the entire trip.
Courthouse Steps
Wrapping It Up
From there we had one night left, but for the first time on this trip the sky didn’t agree with us. Tired, with travel on the horizon and a boatload of awesome shots already packed away, we called it early, said our goodbyes, and went our separate ways. I took the long way home, to see more sights and even physically and mentally exhausted I was feeling great, but also ready to be home with my family.
I didn’t even get to talk about editing and all the cool things I learned from the guides on how to process astro images. That will have to wait for another time. But make no mistake, the editing instruction was one of the most valuable parts of this workshop, and I couldn’t have made the images I did without it.
This trip is easily one of the best experiences I’ve ever had, photographic or otherwise. It was made special by the wonderful people on the workshop and by the expert guidance and friendship of Marc and Baillie. If you ever have an opportunity to work with or learn from either of them, I can’t recommend it enough. I knew almost nothing about astrophotography when I arrived, and I came home with new skills, unforgettable memories, and some of the most amazing images I’ve ever taken.
You can learn more about Marc and his workshops here.
Make sure to follow them on Instagram and see the amazing work they produce: