Where’s the line between photography and digital art? In contests and in the field, editing often raises debates. Is masking, blending, or gradient work just part of the craft — or does it cross into something else entirely?
I was sitting in a major wildlife publications contest review and critique zoom session when I heard a judge mention that masking was against the rules. Having never seen that in the rulebook, I decided to ask a question. The response I got from another participant stuck with me:“We’re photographers, not graphic artists.”
It was said so casually, as if editing a photo somehow disqualified it from being “real photography.” Honestly, it rubbed me the wrong way. But it also got me thinking.
Because here’s the truth: every professional photographer edits their work. Always has. From the darkroom to Lightroom, editing has always been part of the craft. Ansel Adams didn’t just press a shutter and walk away. He spent hours in the darkroom dodging and burning to bring his vision to life. As he once put it: “Dodging and burning are steps to take care of mistakes God made in establishing tonal relationships.”
Today we are doing the same thing with different tools.
So when contests aimed at amateurs set rigid rules about editing, often banning techniques that professionals use every day, it sends a strange message. It teaches newcomers that the very thing that makes photography is off limits. That the raw file from your camera is some kind of sacred “truth,” when in reality it is just data waiting to be shaped.
And the irony? In those same critiques, judges will talk about cloning out this or masking that, perfectly fine for your portfolio but somehow not allowed in the contest.
This really got me thinking. Why are amateurs forced to follow a mythical set of rules that professionals don’t? What does that teach people just getting started in photography? And how much is it holding them back from creating the best possible work they can? I want to explore that by starting with the origins of editing, looking at what a RAW file really is, and examining how these rigid contest rules set an unfair standard that holds back amateurs with unrealistic expectations of what photography is. From there I’ll share my personal belief in ethical editing and walk through examples of how I apply it in my own work.
Every photograph is edited
Photography has never been about pressing a button and walking away. In the days of film, the darkroom was where the real magic happened. Photographers like Ansel Adams would spend hours dodging and burning prints, adjusting exposure in specific areas to guide the viewer’s eye. Chemicals, papers, and enlargers were all tools for shaping tone and mood. That work was not seen as cheating, it was simply part of the process. Even the film you used was essentially what we now call a “color profile.” Kodak, Fuji, Ilford, Agfa each had its own look baked in, and photographers chose film not just for speed (ISO) or grain, but for the way it rendered color, contrast, and skin tones.
Today, Lightroom and Photoshop serve the same role as the darkroom. The tools have changed but the intent has not: to take the raw material the camera captures and refine it into the photograph you envisioned when you pressed the shutter. If you shoot in JPEG this process happens inside the camera, it loads its own color profile and effectively edits the photo for you. Think about the "Leica look" or Hasselblad’s famously rich colors. That is color science built into the camera, an edit applied automatically to the raw data the sensor records. But when you choose to shoot in RAW, you take control of those decisions yourself. That is where the power and artistry of photography truly live.
What a RAW File Really Is
A RAW file is not a finished photograph. It is unprocessed data recorded by your camera’s sensor, the digital equivalent of an undeveloped negative. On its own it often looks flat or dull, not because the photo is bad but because it has not been interpreted yet.
What a RAW file is not is some sacred, untouchable truth. It is no more “real” than a roll of film sitting in a canister. A RAW file cannot be displayed properly without processing, which means every photo you have ever seen, whether professional or straight out of camera, has been edited in some way.
The difference lies in who makes the choices. In JPEG, the camera does. It applies sharpening, contrast, color profiles, and noise reduction automatically. In RAW, you do. You decide how bright or dark the image should be, how the colors should feel, how the tones should flow. RAW is freedom, but it is also responsibility. It is up to the photographer to shape the image into its final form.
That is where tools like Lightroom, Photoshop, or DXO come in. They are not there to fake a photo, they are the modern version of the darkroom. They allow you to take that flat RAW file and bring it to life, shaping it into the image you saw in your mind when you pressed the shutter.
With global adjustments you set the foundation, balancing exposure, contrast, and color so the image feels true to the moment. With selective edits you can guide attention, lift shadows, or tame highlights in ways that mimic how our eyes actually experienced the scene. What once took hours hunched over trays of chemicals can now be done in minutes on a laptop.
What these tools will not do is make something appear that was never there. A RAW file is data, not fantasy. Editing it will not suddenly insert a bird into the sky or paint in a mountain that was not in the frame. The light that was present will still exist, the shadows, the reflections, the imperfections. Sure, with AI you can now generate or replace elements, and that is a separate conversation I will get into later. But the core process of editing a RAW file does not change the photograph, it refines and completes it.
Why Contest Rules Can Hold Photographers Back
Photography contests are meant to inspire growth, but too often they end up teaching the wrong lessons. By banning editing techniques that every professional uses, they create an environment where photographers are rewarded for producing technically constrained images rather than expressive ones.
Instead of encouraging entrants to refine their vision, shape their files, and develop their editing skills, these contests push people to chase an unrealistic idea of “purity.” The result is that amateurs learn how to obey restrictions rather than how to tell stronger visual stories.
The irony is that professionals, including the very judges critiquing these contests, freely use masking, selective adjustments, cloning, and more in their own published work. Contest rules aimed at beginners create a strange double standard. The message is essentially “do as we say, not as we do.”
This does not help new photographers grow. It makes them afraid to explore the full creative process. It suggests that editing is somehow dishonest, when in truth it is one of the most important parts of photography. If we teach people that they are not allowed to shape their images, we hold them back from discovering their own voice.
We should not expect more from amateurs than we do from professionals.
Transparency in Editing
Too often photographers treat editing like a secret step they would rather not talk about. Some even act as though post-processing is a kind of shortcut instead of a core part of the craft. I do not believe that helps anyone. Editing is not only necessary, it is essential for turning a RAW file into a finished photograph. The camera captures raw material, but the artistry happens when you shape that material into the image you envisioned.
I think we should all be more open about this process. Sharing how we edit does not diminish the work, it shows the care and choices that go into making strong photographs. Transparency also helps others learn, especially newer photographers who might otherwise think their flat RAW files are failures rather than simply unfinished.
To keep myself accountable and clear, I break my own editing into three categories:
What I Do Often
RAW processing (exposure, tone, color, contrast, sharpening, noise reduction)
Selective/local adjustments (dodging, burning, masks, gradients, selective color work)
Cropping/rotation for composition
Removing dust spots
AI-assisted noise reduction
Black and white conversions
This is the basic work every RAW photo needs. It is how I bring the image to life, balancing exposure, tone, color, and detail while keeping the scene true.
What I Do Sometimes
Exposure blends (balancing moon and landscape)
Focus stacks (same subject or scene for depth of field)
Panoramas (stitched frames from the same spot)
Astro stacks (multiple subs from one session for noise/detail)
AI-assisted sharpening
Removing distractions that do not change the story
Some situations require extra steps to solve technical limits, but I do not use them to fabricate a scene. I try to stay as close to the same location, elements, and timeframe as possible.
What I Never Do
Add or remove wildlife or major elements
Composite from different locations or times
Use AI-generated content or fake skies
Over-edit to the point of losing realism
These are edits that go beyond photography for me. I do not want to create images that break believability or add things that were not there.
Thats not to say if I snap a casual portrait of someone I won't replace the sky to make the image better for the person, this is saying in my "professional" work these are the rules I follow.
For me, these categories draw the line between refining a photograph and fabricating one. Editing is about bringing the photo to life, not inventing something that was never there.
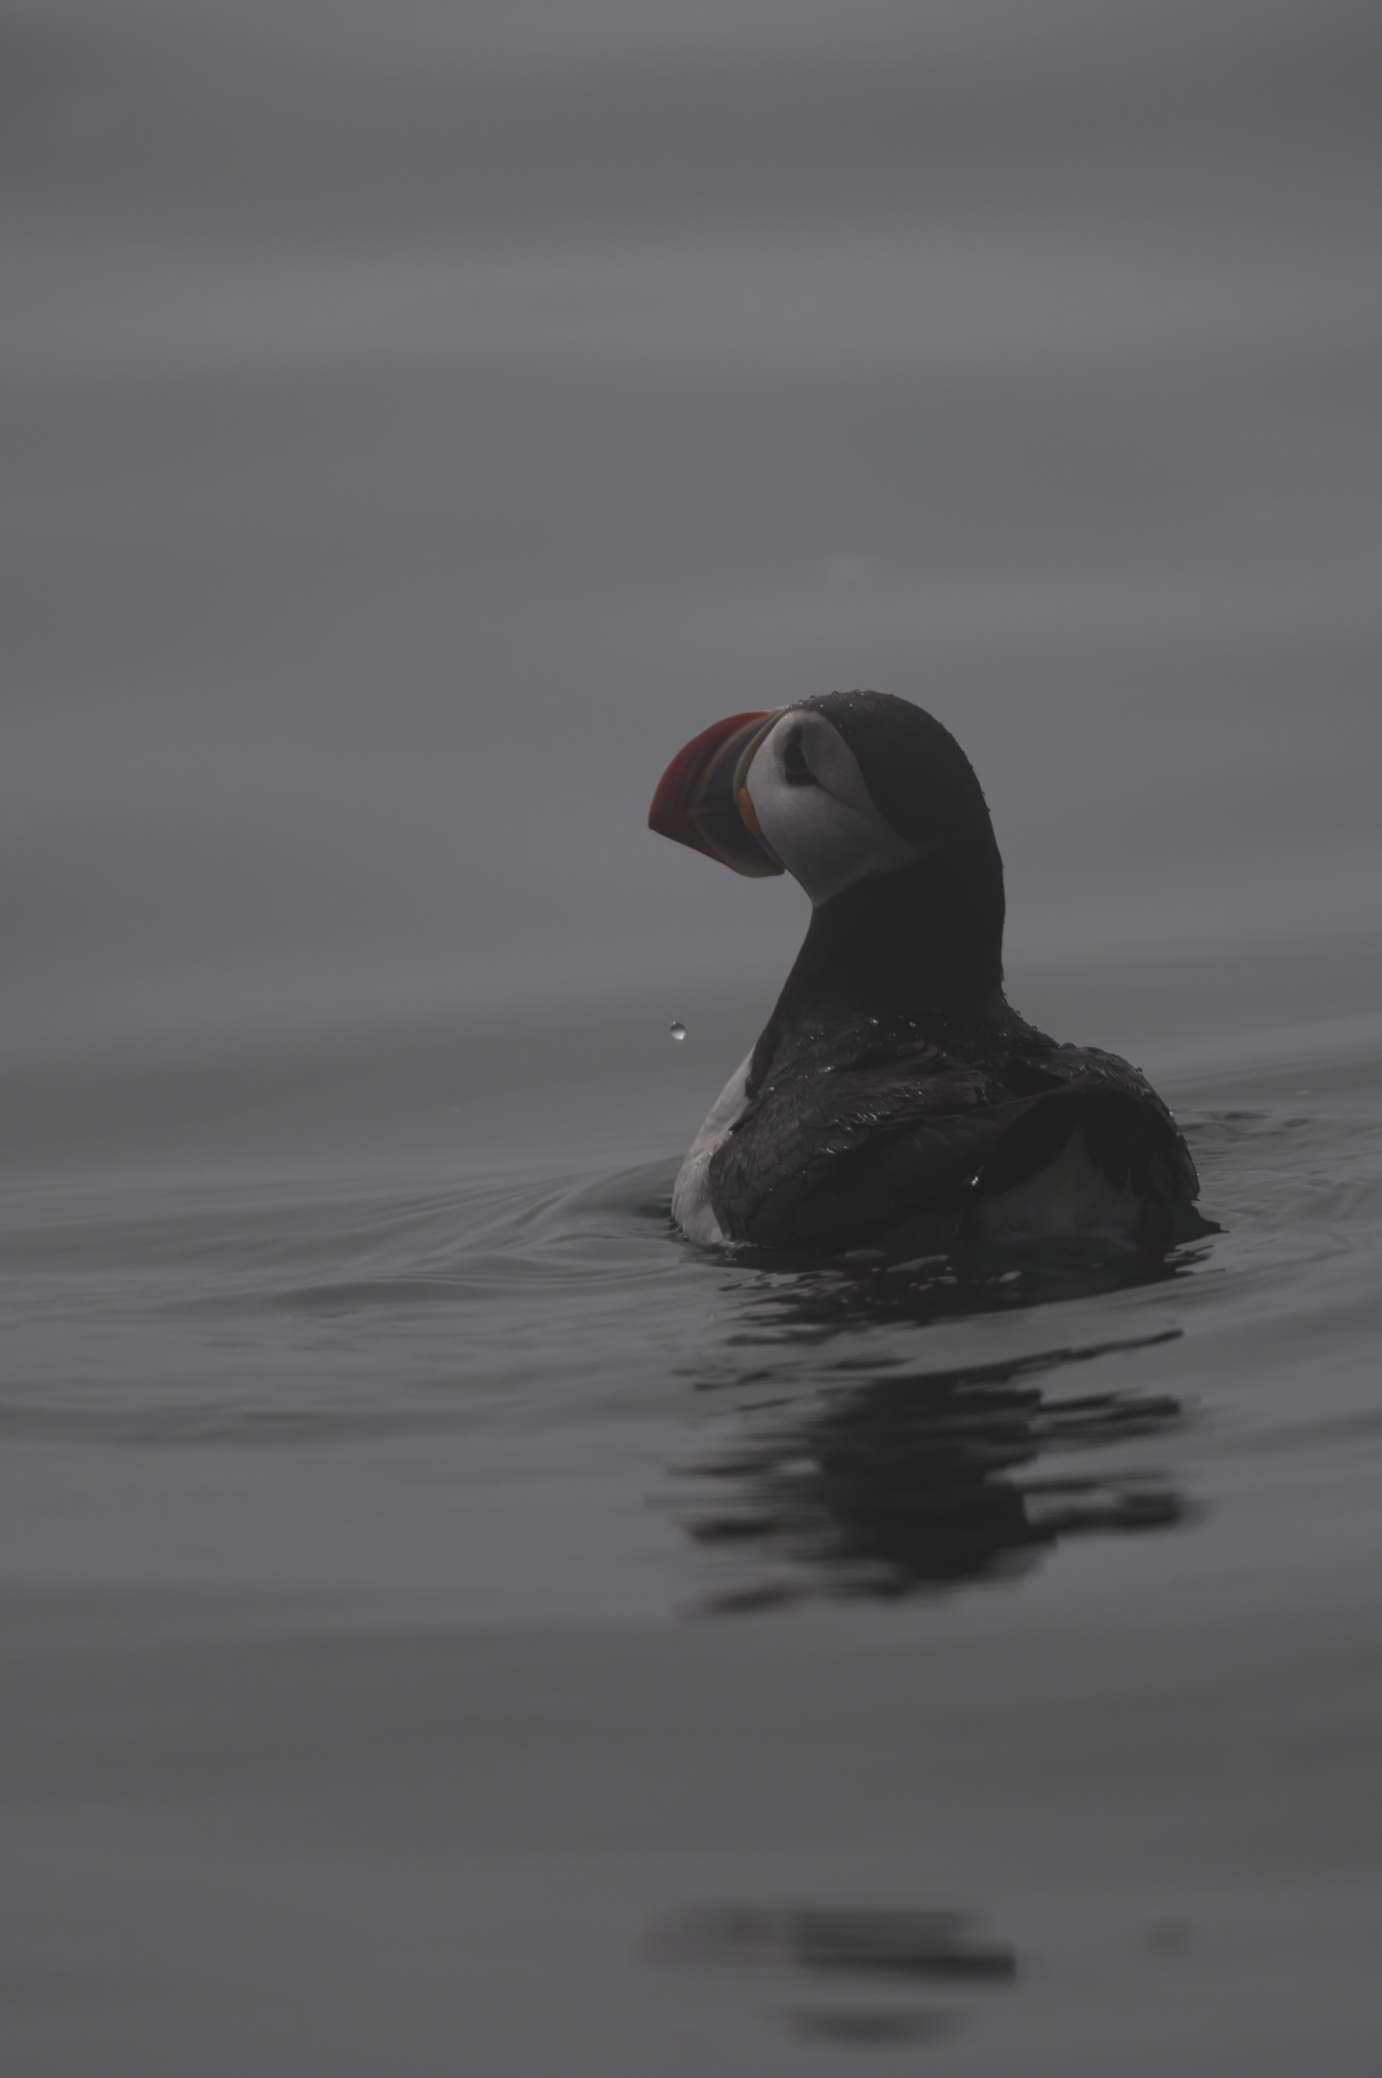
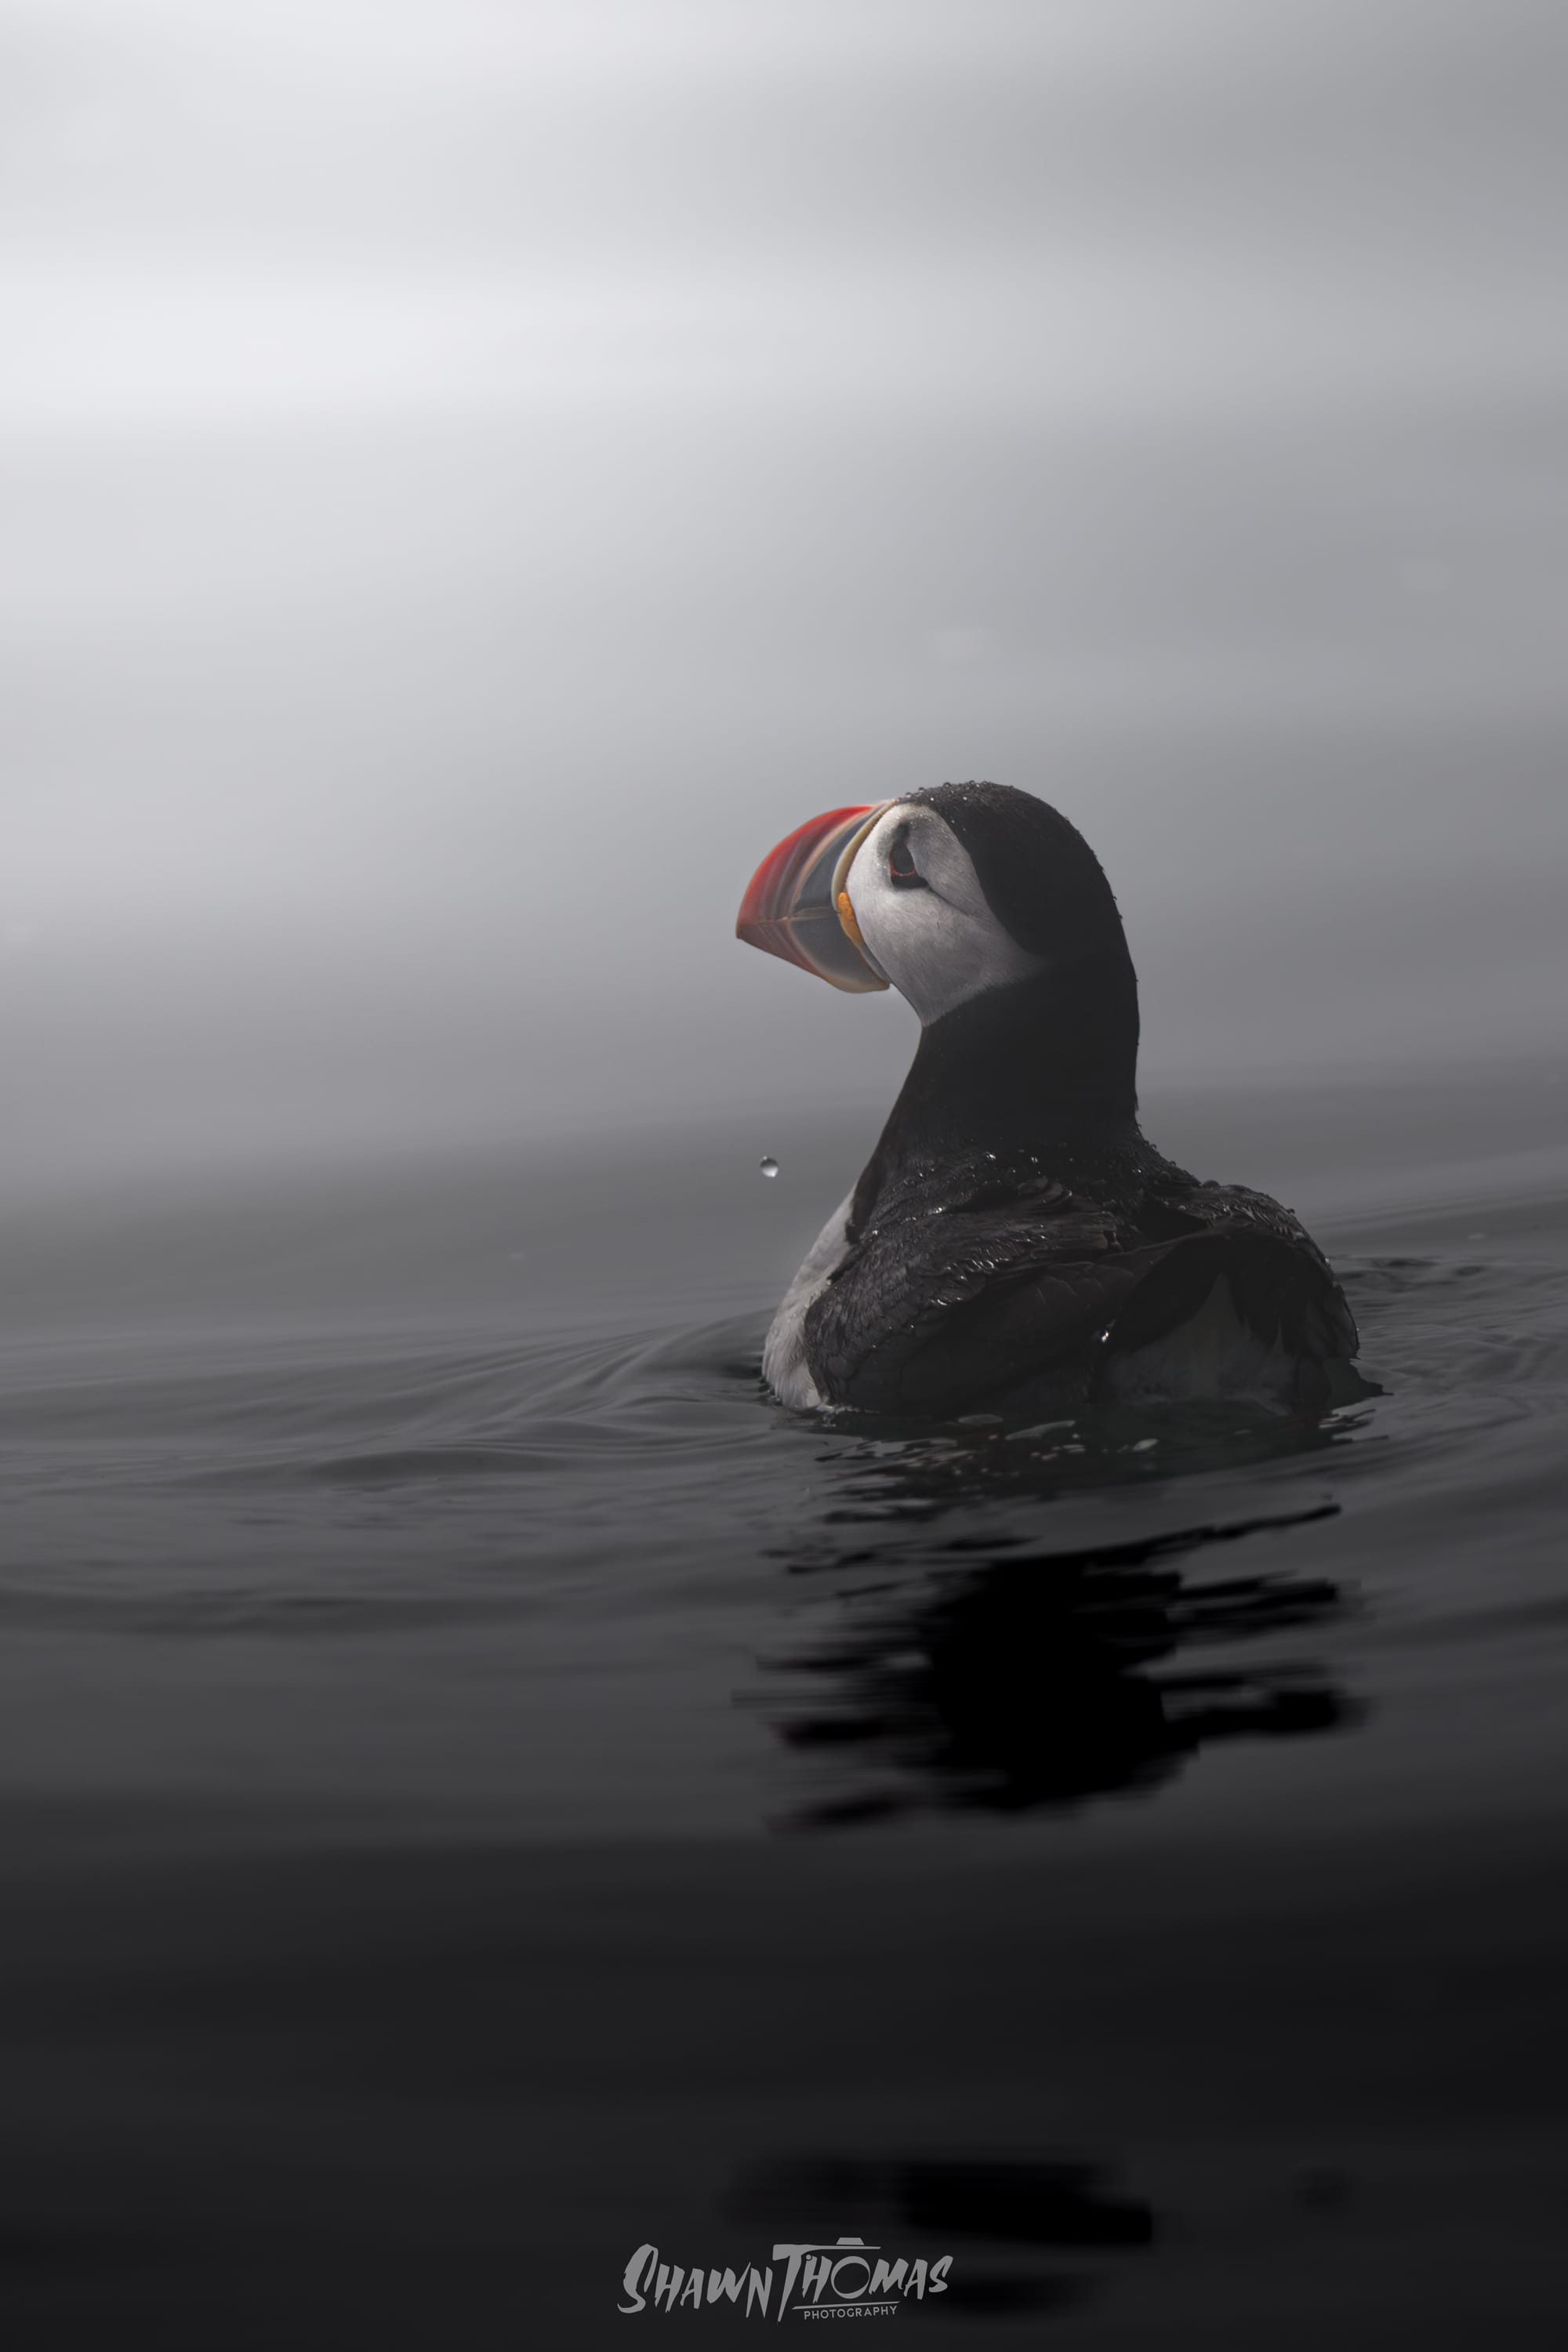
For transparency here is a selection of my shots shown as RAW files next to the final edits. The unedited versions look flat, muted, and sometimes even a little disappointing. That is the nature of RAW. The edited versions are not different scenes, they are simply balanced and refined to match how the moment really felt. This is the step that turns a capture into a photograph.
In the unedited frame the puffin was swallowed by the gray of fog and water, with very little separation between subject and background. My approach was to treat the different parts of the scene as distinct elements, even though they were all technically the same water and light. I used dehaze selectively on the puffin to cut through the haze and restore feather detail, color, and shape. I lifted the shadows and emphasized the subtle spots where light caught on its chest and bill to give the bird dimension. For the background, I actually went the opposite direction, lightening it so the fog remained soft and atmospheric and using a radial mask to direct the light rather than forcing clarity. The foreground water I darkened, which created a sense of depth and gave the puffin a stage to sit on. The result keeps the reality of that foggy morning intact while allowing the bird to emerge with presence and clarity.
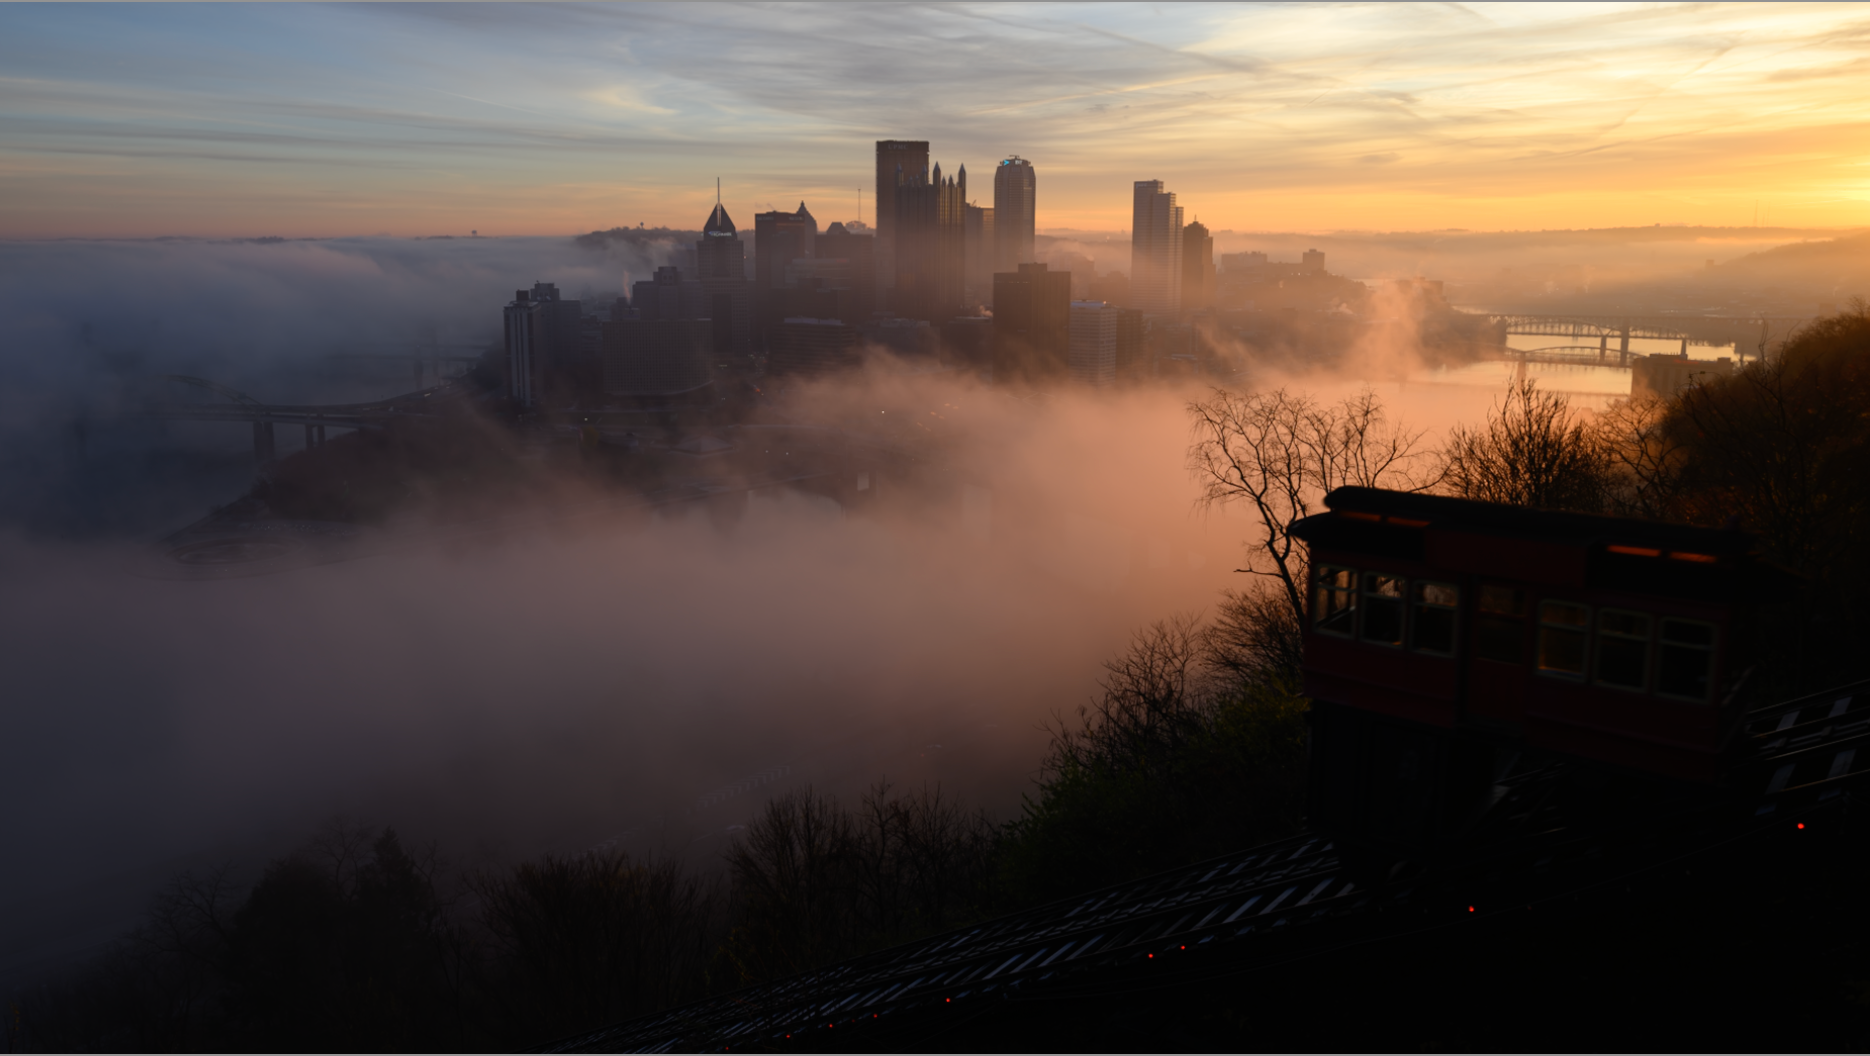
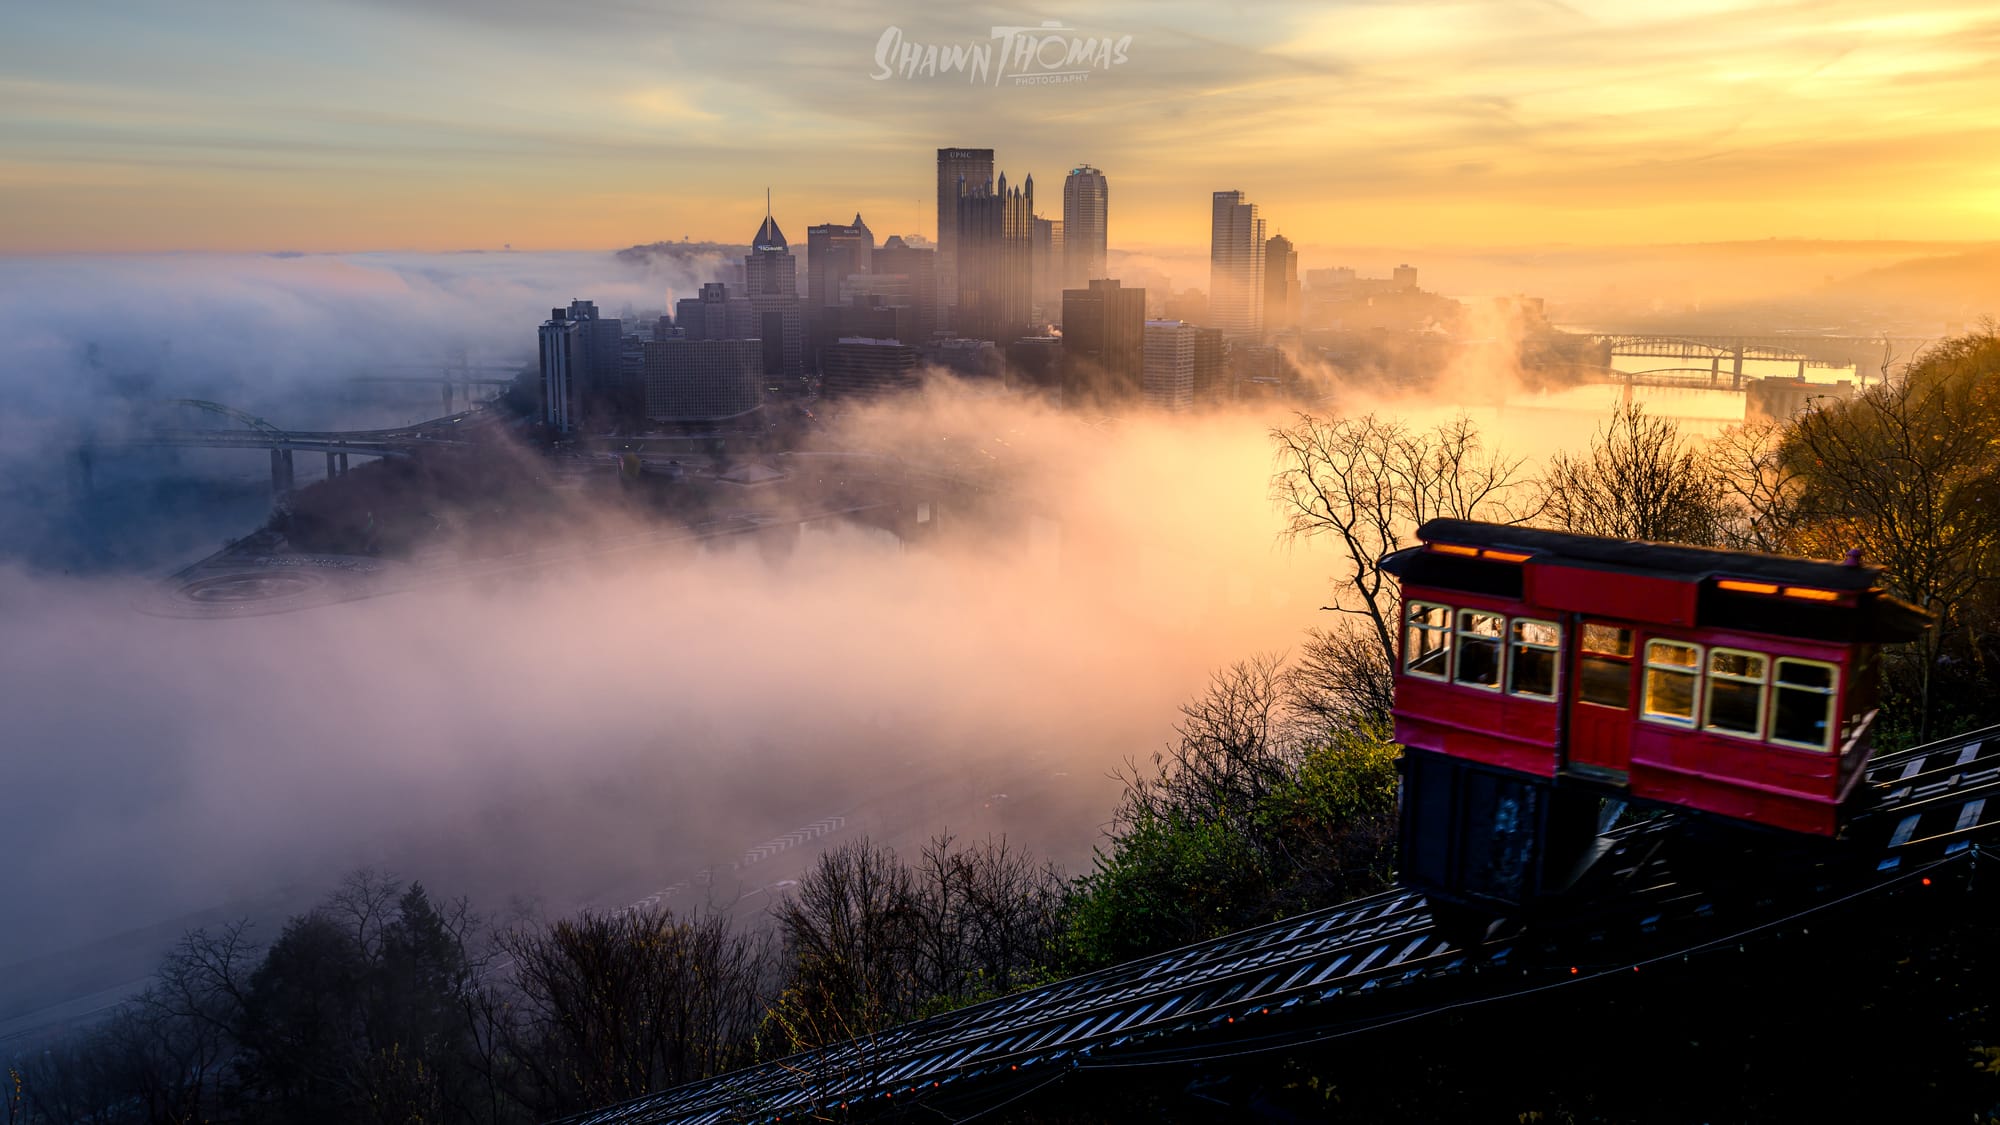
The raw capture held incredible atmosphere with the fog rolling through the city, but it was flat and dark, with the incline car almost disappearing into shadow. My edits focused on revealing the scene’s natural drama without fabricating it. I lifted the fog so it had more glow and dimension, allowing it to wrap around the skyline instead of sitting as a heavy block of gray. The buildings were given just enough contrast to stand against the haze, while the sky’s warm tones were emphasized to balance the coolness of the mist. The incline car was carefully brightened so it became a key foreground anchor, giving the image both scale and story. None of these changes invented anything new—they simply brought forward the color, light, and mood that were already there but hidden in the raw file.
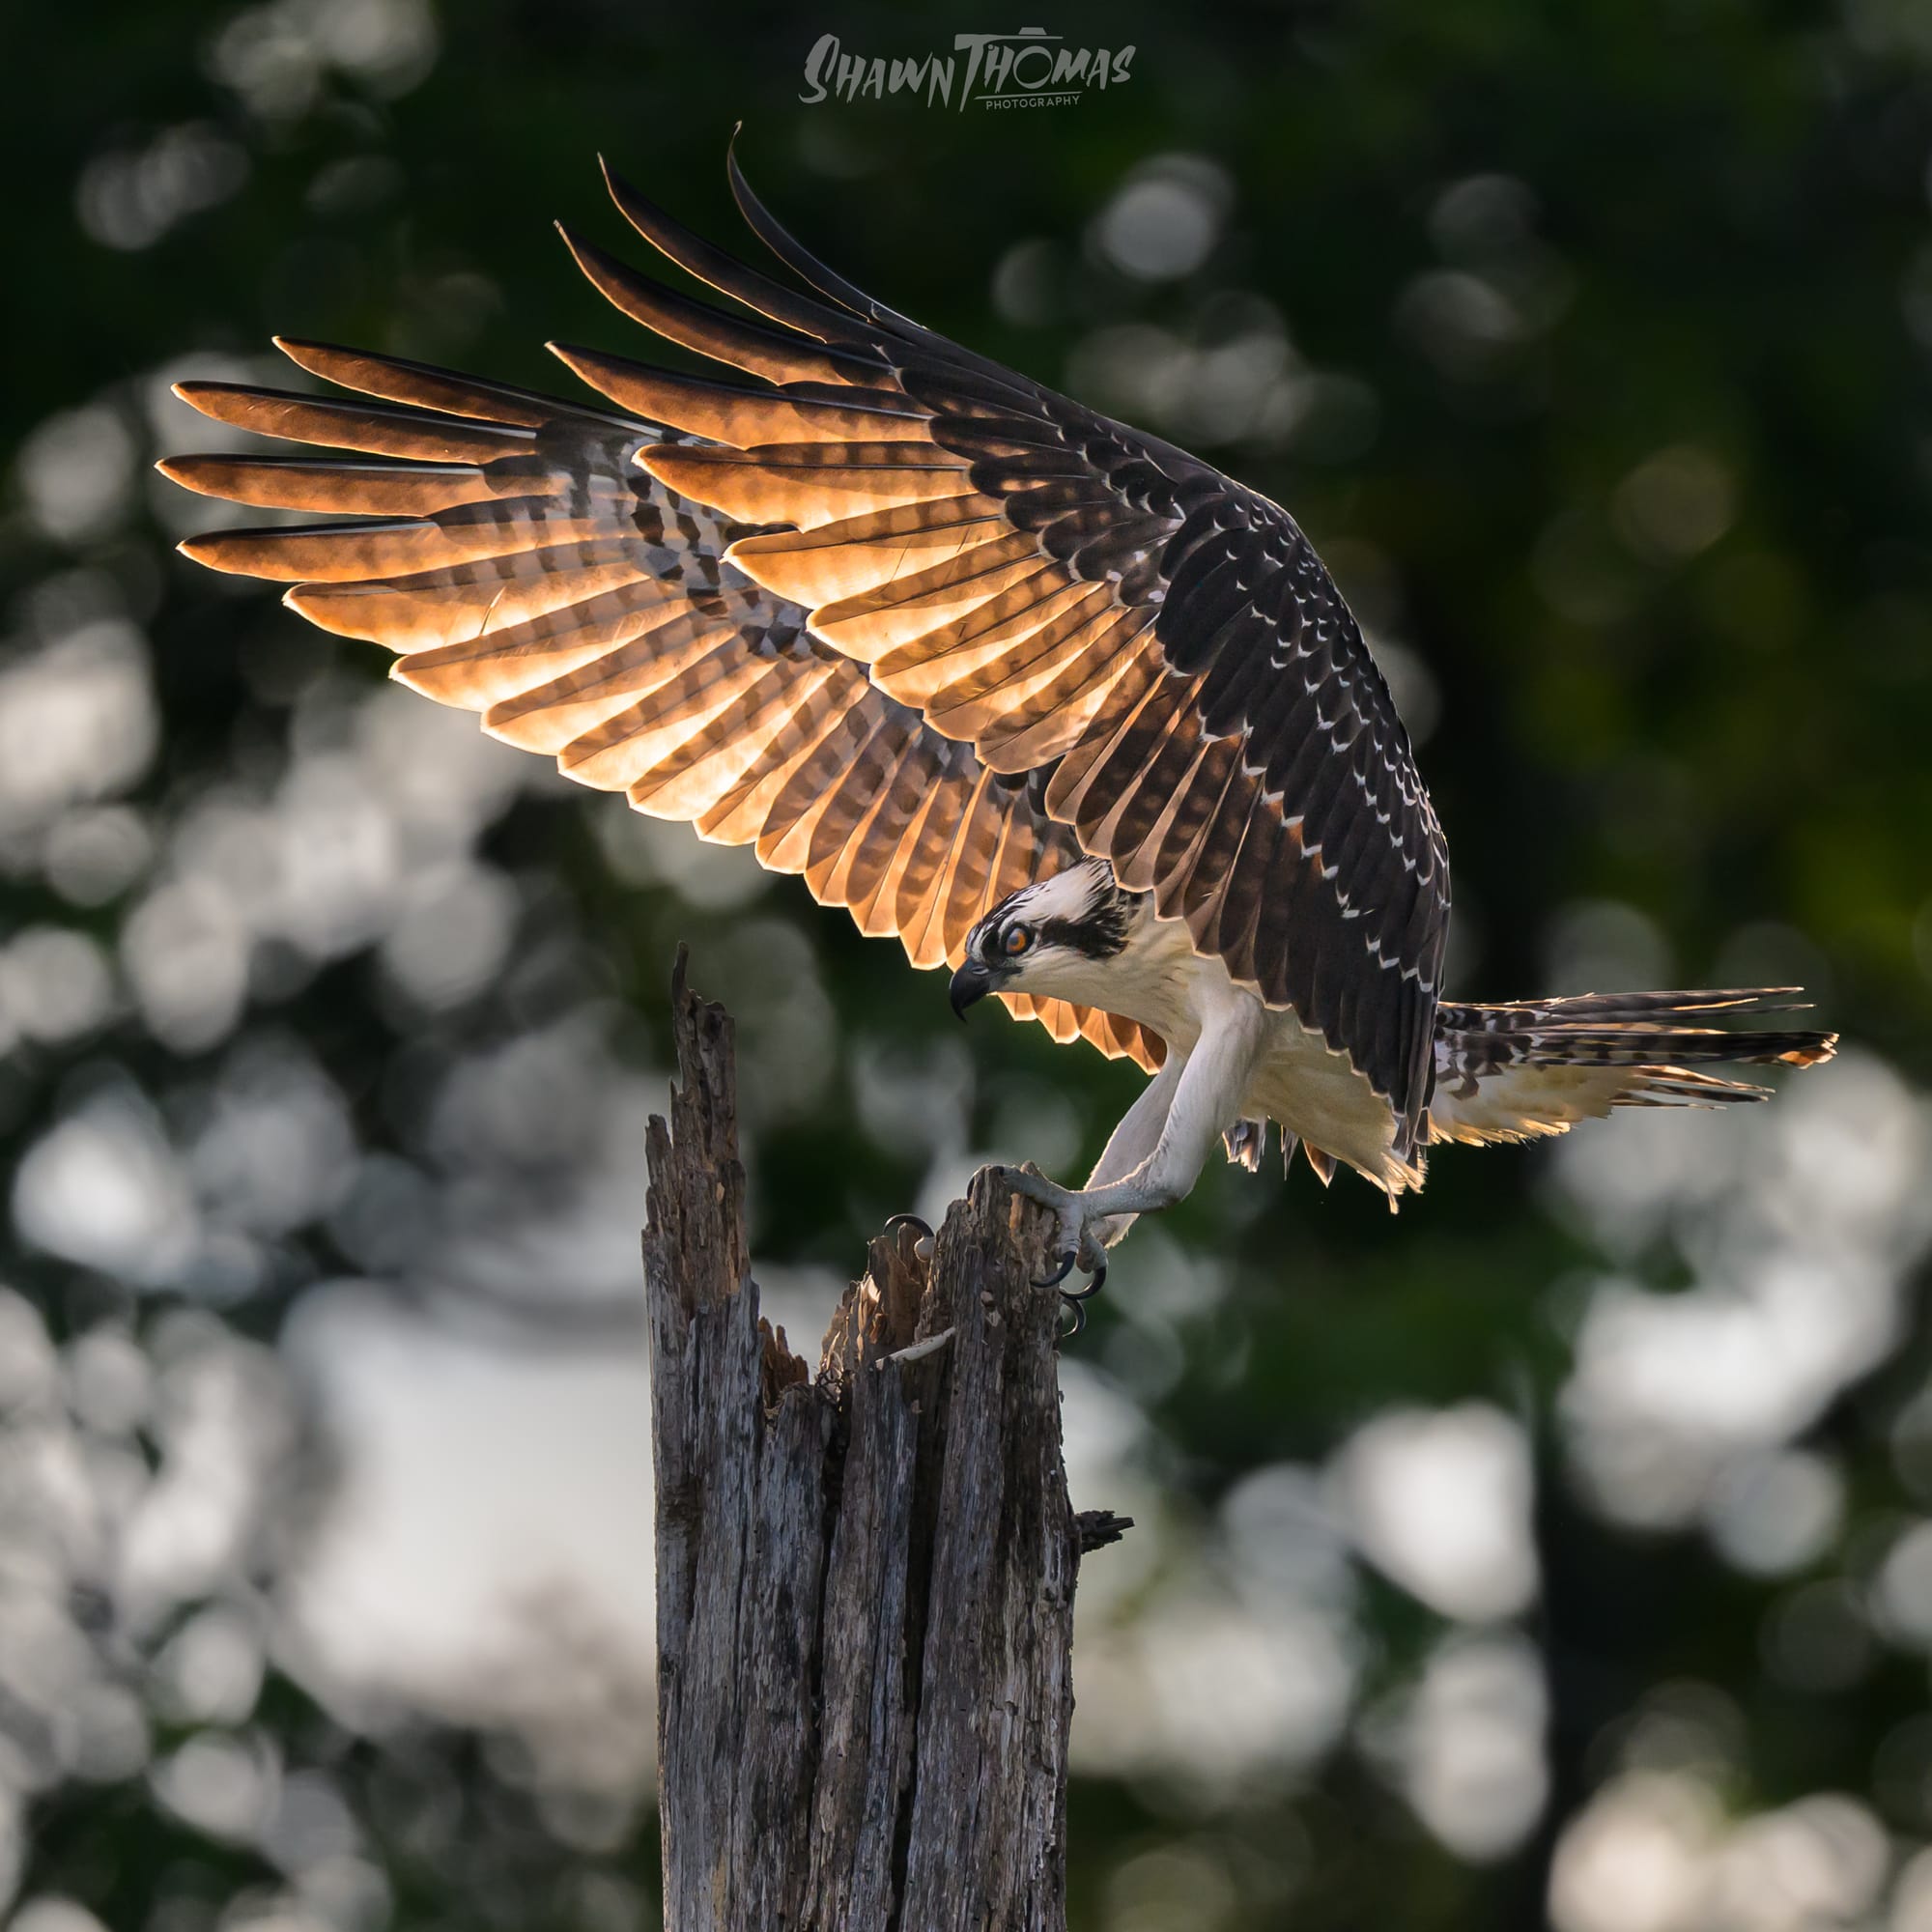
This frame had so much potential straight out of the camera, the backlit wings already glowed I just emphasized that, the shadows and midtones buried the bird’s detail. The edit was about unlocking that hidden drama. I lifted the shadows in the feathers so the structure of each layer could be seen, while keeping the backlight crisp and warm. The perch was brightened slightly to hold its texture, giving context without pulling attention. The background was smoothed just enough to reduce distraction, letting the bird stand out in full. The goal wasn’t to change the scene but to show the brilliance of the light and the strength of the osprey that were already there, waiting to be revealed.
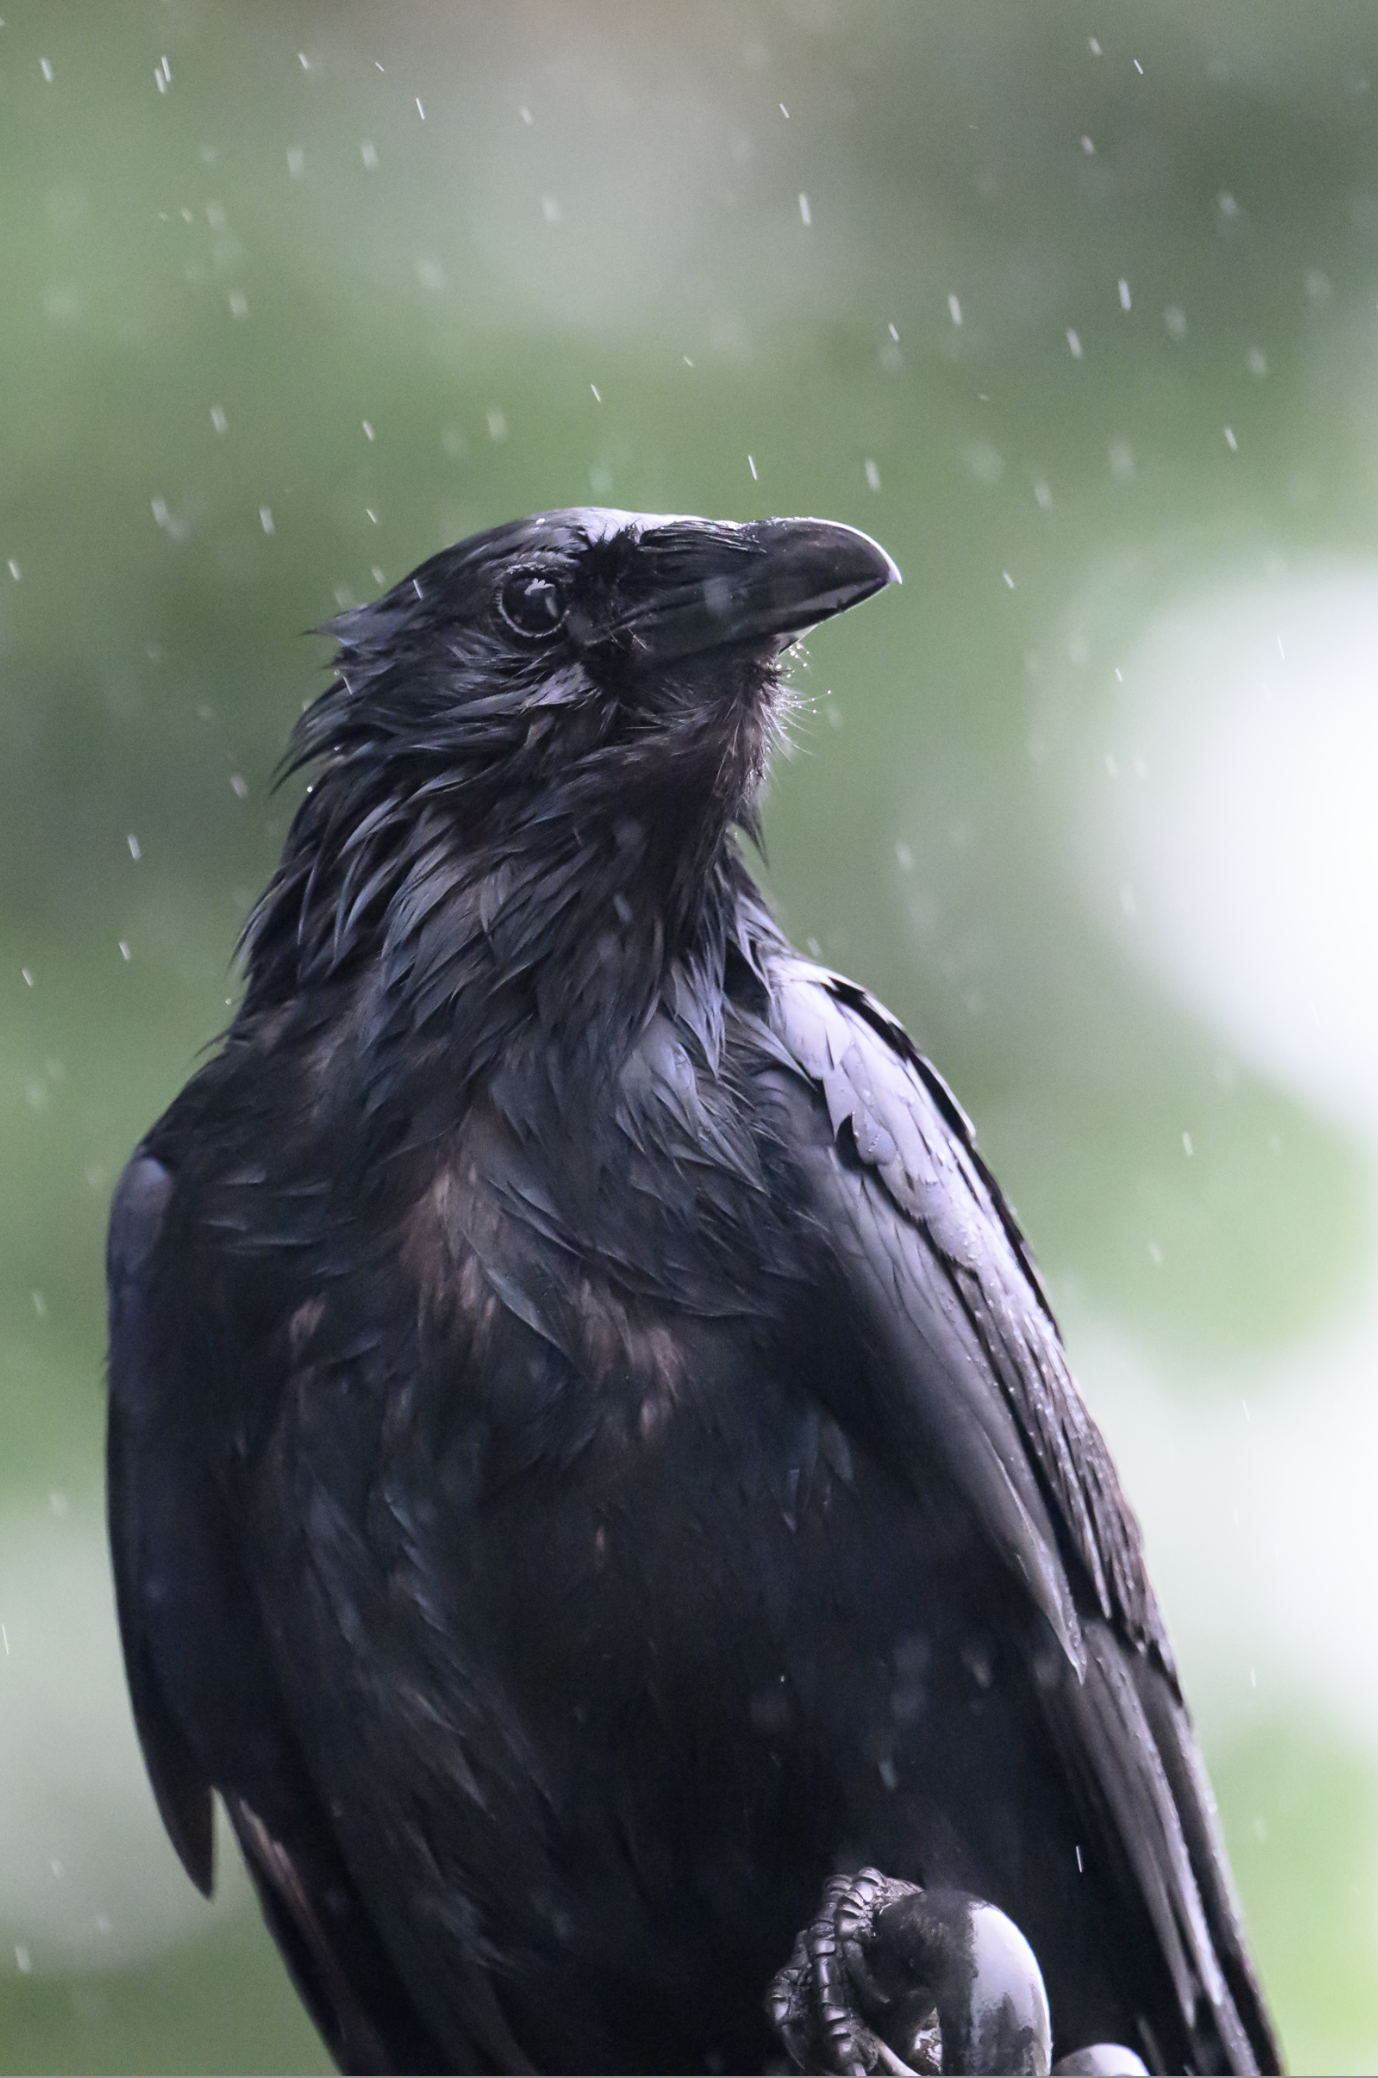
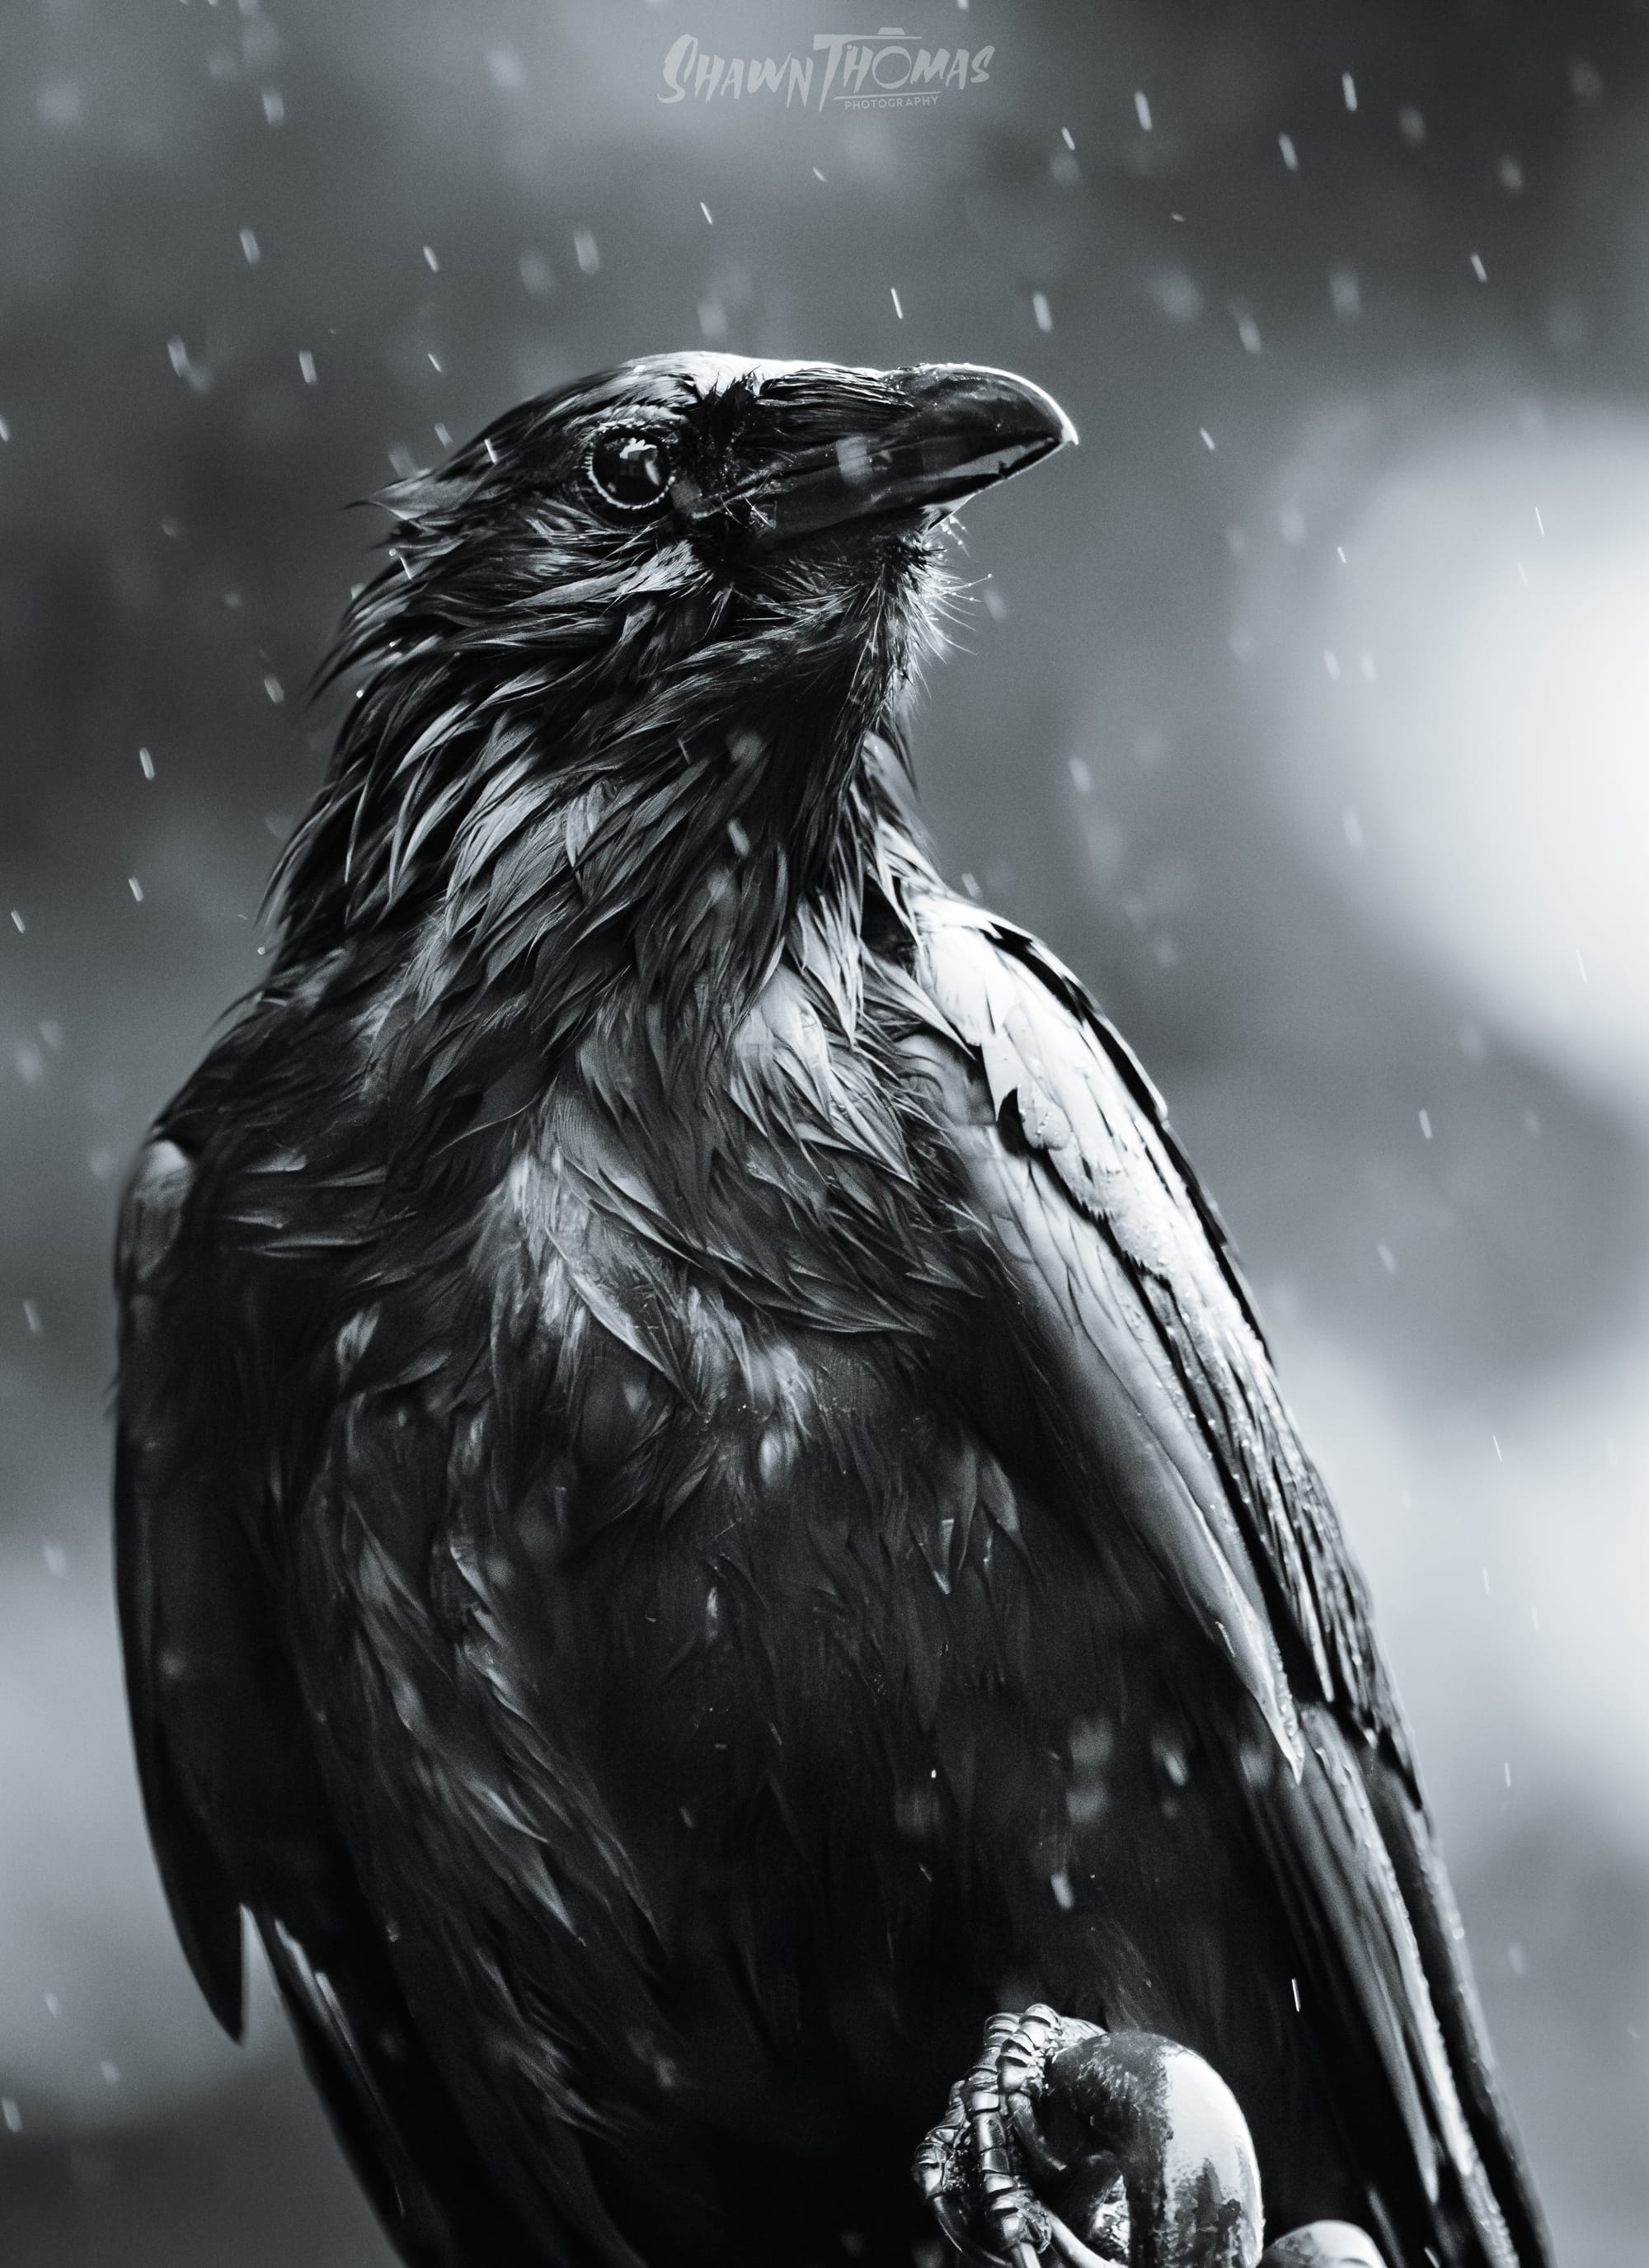
This image has ended up being my most popular piece, and it is one I’ve sold more than any other. It’s a crow caught in the rain, and while turning it black and white might feel obvious, it was also a deliberate stylistic choice. The color version had a mix of greens and highlights that distracted from the form, but once converted the textures of the feathers, the glisten of water, and the weight of the atmosphere all came forward. The rain became more dramatic, the bird more sculptural, and the whole frame shifted from being simply a record of a moment to a portrait with presence.
When the Camera Just Isn’t Enough
For some images a before and after is straightforward. One frame, edited in different ways, and you can see how it transforms. But astrophotography and some very high dynamic range landscape photography is a different game. Many of those shots are not single exposures at all but stacks or blends of multiple frames. Sometimes it is two, sometimes it is thirty or more, all layered together to reduce noise and reveal details the eye alone cannot see.
Because of that it does not really make sense to do a before and after the same way. The raw pieces are just fragments, slivers of light that only become a whole photograph when they are combined. These are some of the most editing heavy images I make, and yet they are also the most honest. A camera cannot capture a galaxy in one shot the way our eyes and brains can stitch together moments over time. The edits are not cheats, they are solutions to the limits of the tool.
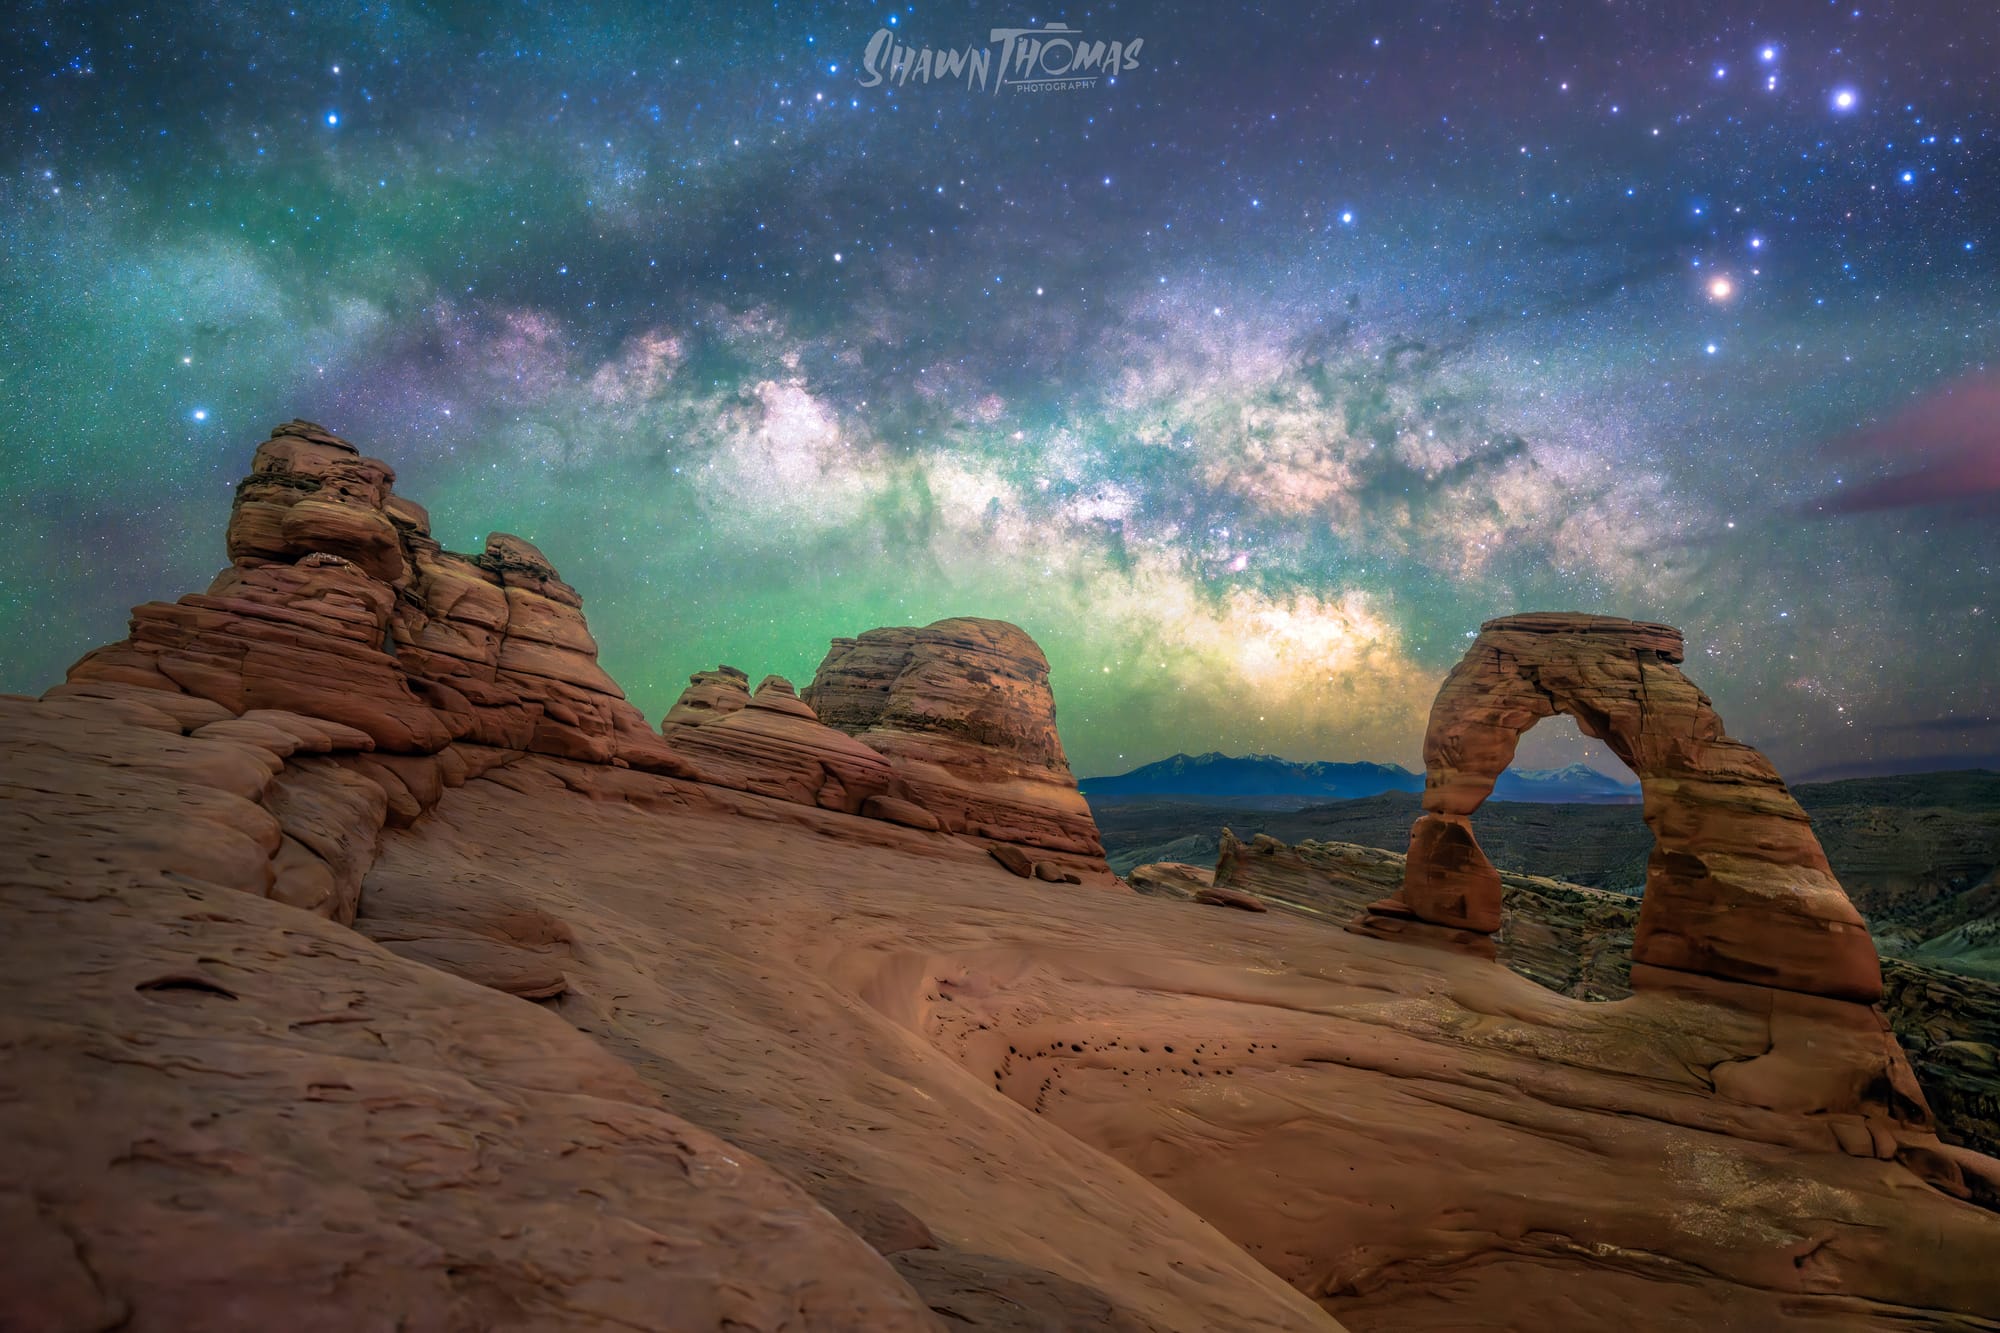
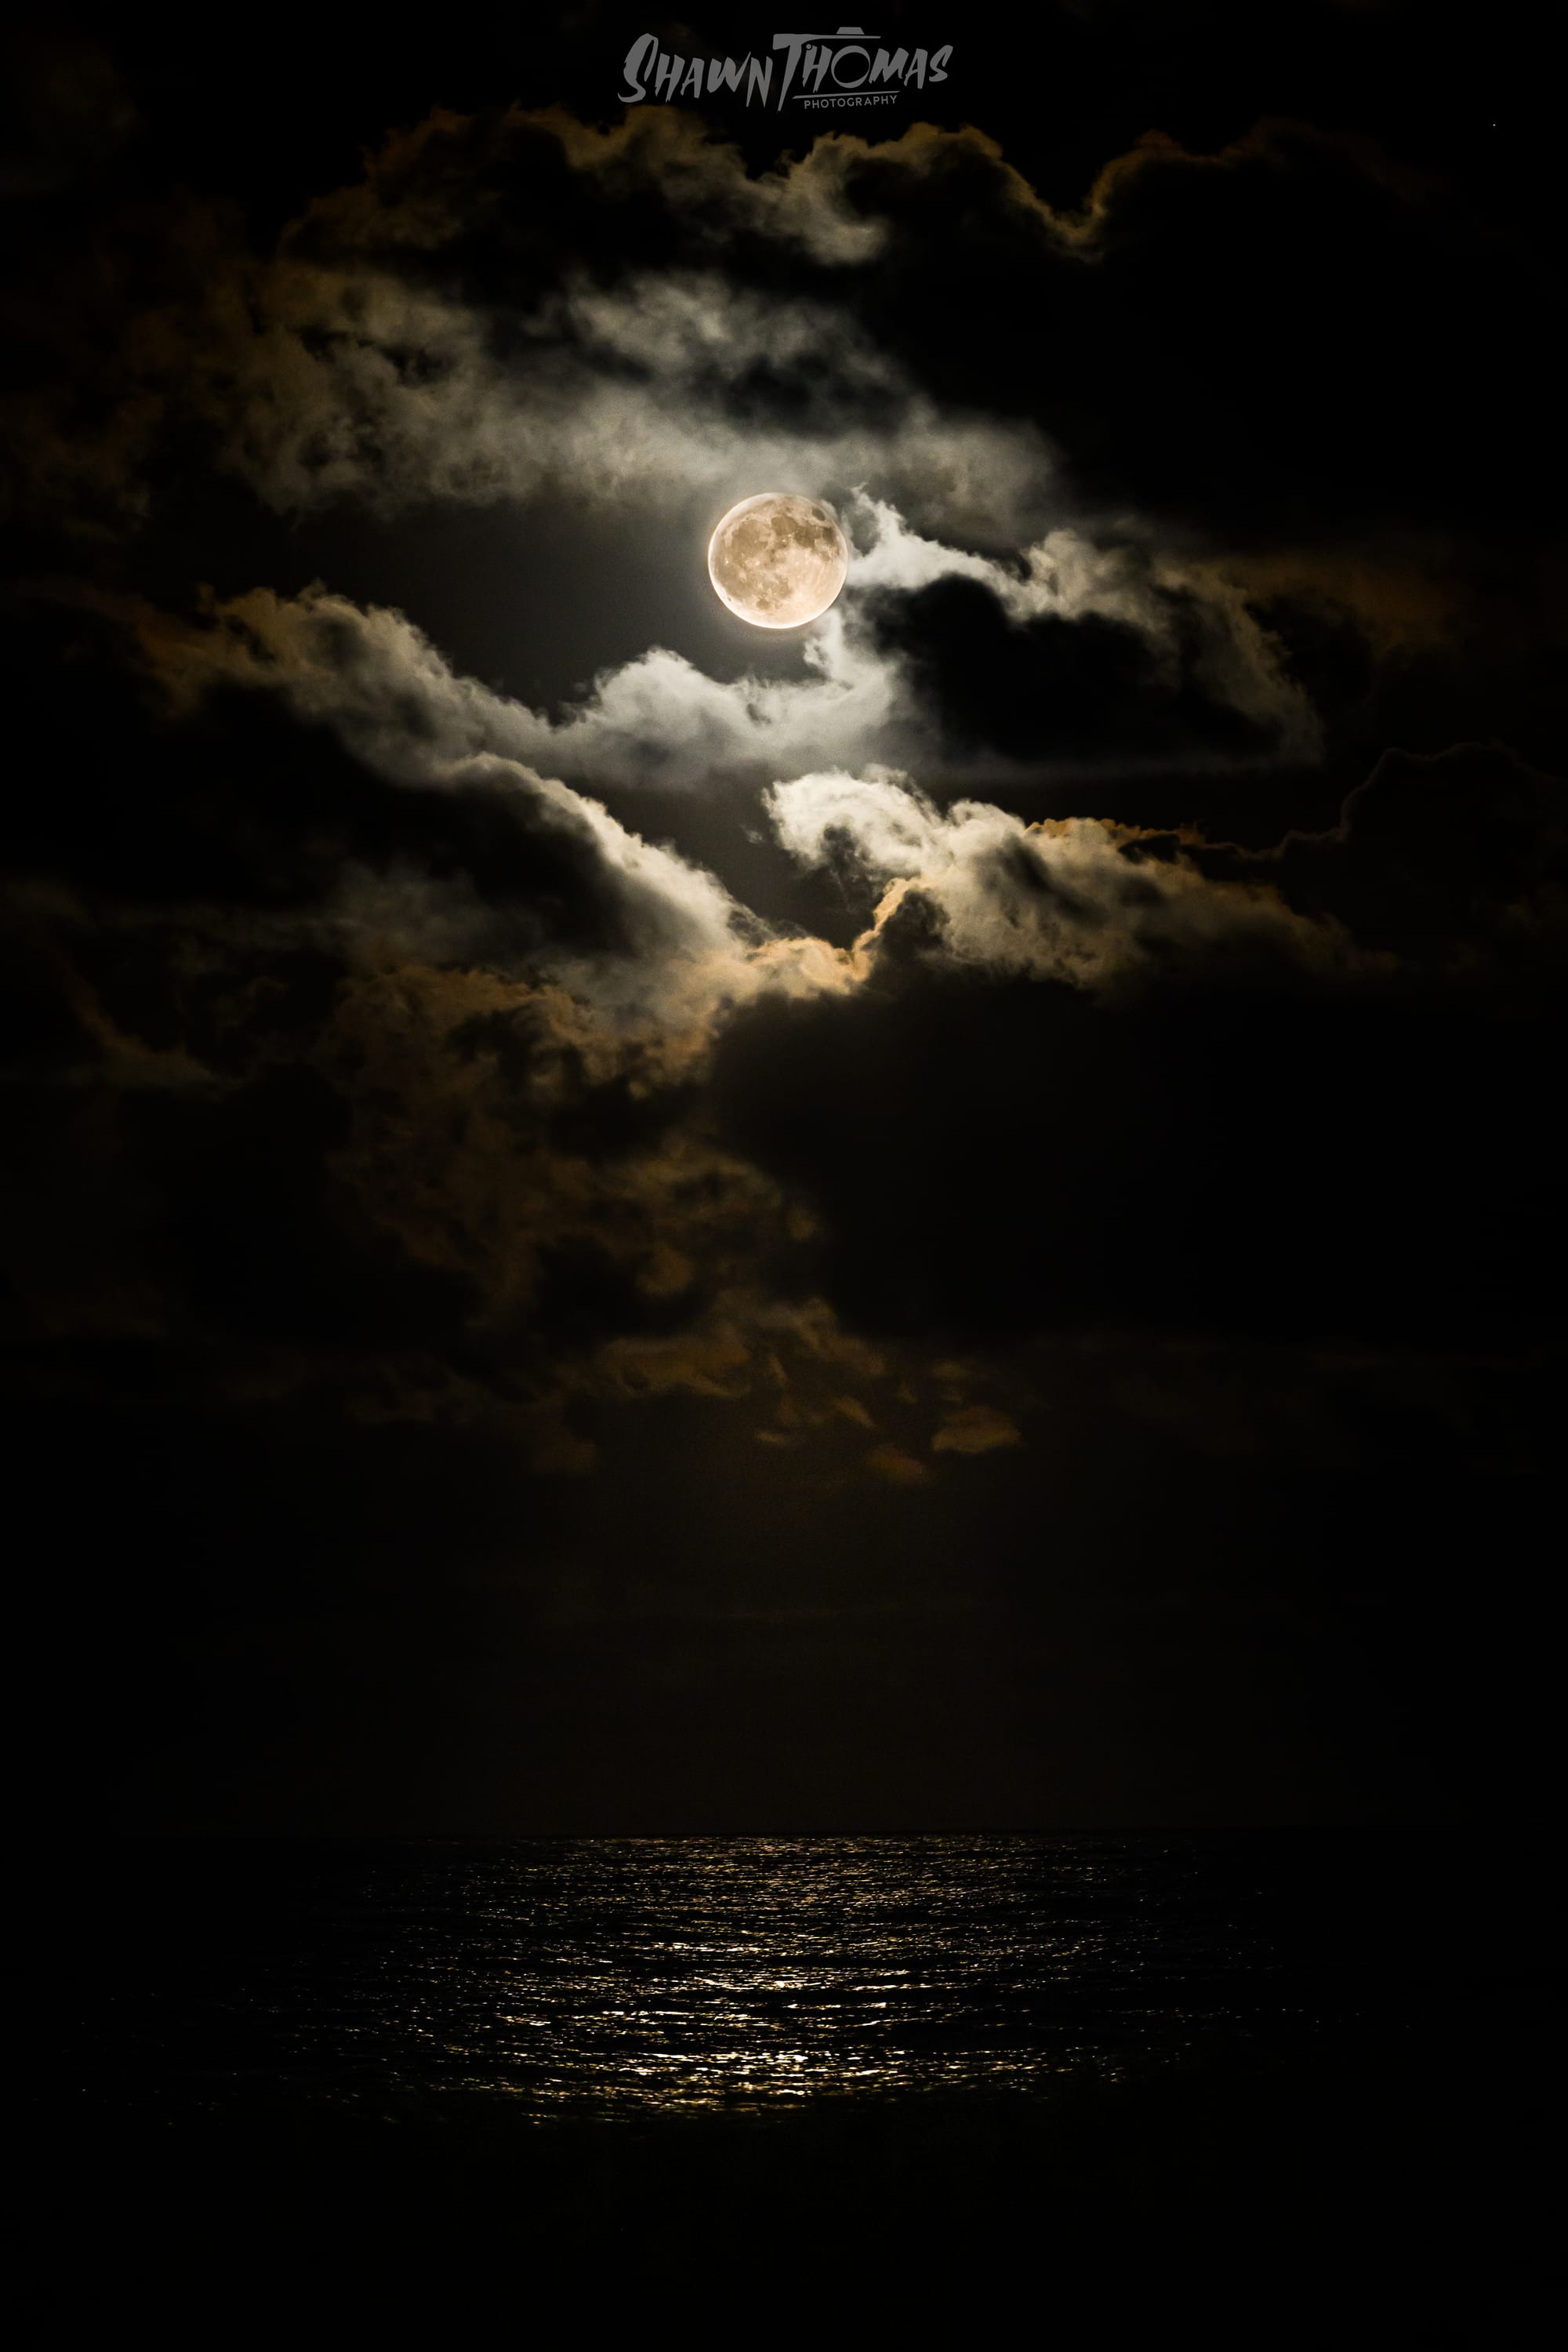
Take Arches for example. That photo is two exposures, one three minutes long on a star tracker for the sky, and one five minutes long for the foreground. Both taken at the same place, at nearly the same time, then blended in Photoshop. It is the only way to make that scene work. Or the moon shot, which is also two exposures, one for the landscape and one for the moon itself, because otherwise it was just a bright white blob.
That is the reality. Cameras are dumb. They do not adapt, they do not adjust, they do not interpret. They just record light, and not always well. Editing is where you step in and bridge the gap between what the sensor spits out and what you actually saw and felt in that moment.
Bringing It All Back Around
If you want to take images like the ones that make you stop, gasp, or feel amazed, learn to edit. Every photograph you admire has been shaped in some way after the shutter was pressed. Do not listen to the people who say editing is cheating. Photographers have always edited. The darkroom was editing. Picking a film stock was editing. Choosing how to print was editing. Today we just use different tools.
Being a photographer is about a lot more than where you point your camera. Composition, patience, timing, light, and yes, editing, all come together to make a finished piece of art. The RAW file is just the beginning. What you do with it afterward is where your vision comes alive.
So build your skills, lean into the process, and experiment until you find what feels true to your style. Editing is not a shortcut, it is part of the artform. The more you practice it, the more you’ll discover your voice as a photographer.
If you want to dive deeper into how I approach editing, you can read more about my philosophy here: shawnthomas.art/philosophy